|
|
|
|
 Pro/LAN Pro/LAN
|
|
Date Posted: Oct 21 2002
|
|
Author: pHaestus
|
|
|
|
|
Posting Type: Article
|
|
Category: ProCooling Projects
|
|
Page: 3 of 5
|
|
Article Rank:No Rank Yet
Must Log In to Rank This Article
|
|
|
|
|
Note: This is a legacy article, imported from old code. Due to this some items on the page may not function as expected. Links, Colors, and some images may not be set correctly.
|
|
|
Pro/LAN By: pHaestus
|
|
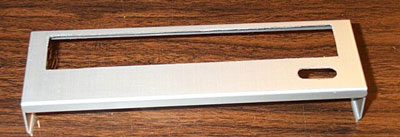
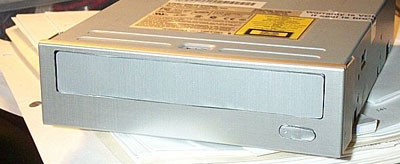
CD-RW Bezel- One of the drawbacks to most Lian Li cases is that you have to do something with your beige drives if you want the front of the case to be pleasing to the eye. Lian Li makes stick on bezels, but none of the ones they make fit my Liteon CD-RW correctly. You can vinyl dye the drives to a more or less aluminum color, but that wasn't exactly the look I was seeking. Instead, I opted to make my own faceplate for the CD-RW out of a 5.25" bay cover. I started out by cutting a rough hole for the caddy and then drilled out holes for the eject button.
|
|
 |
|
|
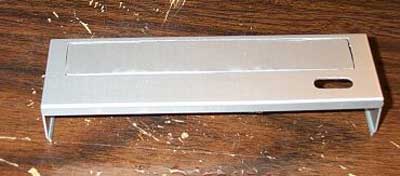
Next, I filed the edges away for many hours to get a more or less even and attractive faceplate. Then, I used a piece of scrap aluminum from the side panel to make a cover for the CD-ROM tray. This piece had to be filed for quite a while as well.
|
|
 |
|
|
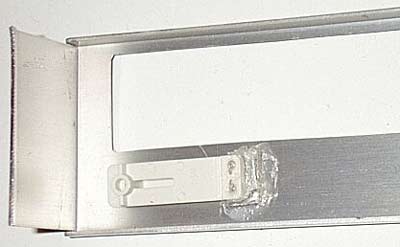
The next step was to disassemble the CD-RW's stock bezel. I popped off the plastic eject button from the back of the plastic bezel. I used some more scrap aluminum to make an eject button and to raise the stock plastic button away from the aluminum faceplate. Then, it was time to break out the Goop! First, I used Goop to hold the button assembly in place after checking that it would properly eject.
|
|
 |
|
|
Then, I Gooped the aluminum cover for the front of the tray in place and made sure everything fit together properly.
|
|
 |
|
|
The operation was a success, and as a bonus it is possible to reassemble the original beige plastic bezel without any noticeable damage if I decide to use it in another system. The finished drive looks much nicer than either the stick on bezels or drives colored with vinyl dye.
|
|
|
|
|
|
|
|
|
|
|
|
|
|
|
|
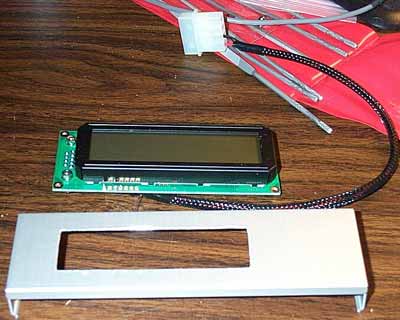
CrystalFontz 632 LCD- One of the first things that I decided to add to the PC-50 was an LCD display. I had plans to put together a rather complicated diode reader PCB, and I wanted a simple method to be able to see the temperatures. I chose a CrystalFontz lcd because (i) I was really impressed with the quality of my CrystalFontz 633 and (ii) I was really impressed with their customer service and RMA procedure when I somehow shorted out my CF 633. The 632 is a 2x16 serial LCD with very little assembly required. To prepare it for installation, I had to solder two wires to the PCB for the LCD's backlight (+5V and ground). The only tricky part is to make sure that you don't wire the LCD to 12V by mistake (I am guessing that you would get sizzling electronics that way). After I soldered those two wires, I then cut up another bay cover for the LCD.
|
|
 |
|
|
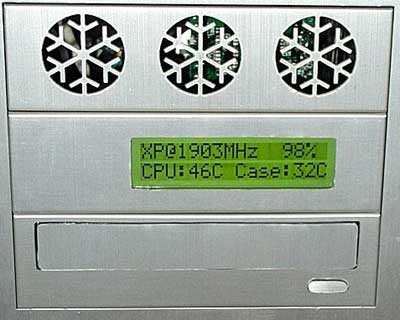
After I had a decent looking faceplate, I mounted the LCD using some of the black plastic plastic grommets that Lian Li ships for holding fans onto the case. I used (you guessed it) Goop to hold the base of the grommets in place on the aluminum faceplate. Then, after they dried, I popped the smaller pieces into the bases and locked everything in place.
Connecting the LCD to my PC was really simple because it is a complete serial unit. No soldering was required; I just had to connect a serial cable to the LCD and to a COM port of my motherboard. For the "legacy-free" crowd, USB to serial adapters are available.
|
|
 |
|
|
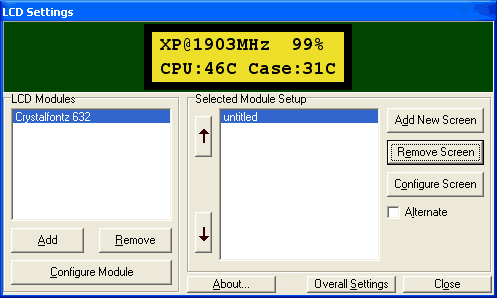
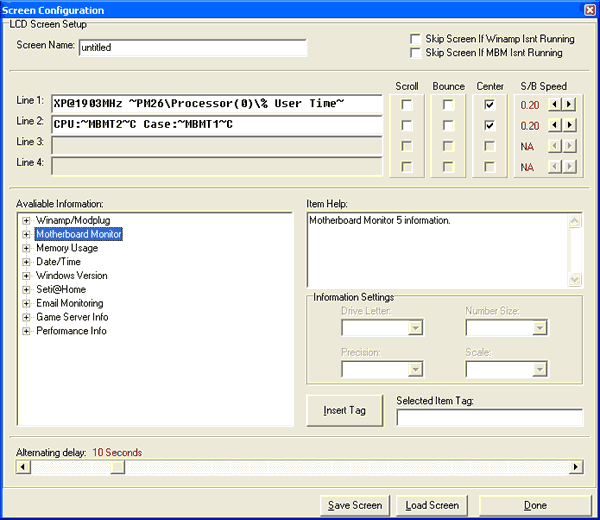
Once I had the LCD display installed, I tried out the CrystalFontz CrystalControl software. The software is extremely easy to configure. When it is launched, then you are greeted with a screen that presents you with a pictoral view of what is seen on the display and options to (i) Change or configure the LCD module that you are using or (ii) Configure the output that is displayed on the LCD.
|
|
 |
|
|
CrystalFontz software supports all of their serial LCDs (including the CF 633) and generic parallel port LCDs as well. Just choose the LCD that you have, the port on which it is located, and you are done.
|
|
 |
|
|
Once the type of LCD has been selected, the onscreen output can then be configured with a wide array of information. The Crystal Control software can pull system performance information (memory or processor usage), Motherboard Monitor information (temps, voltage, CPU speed), e-mail messages, winamp playlists, and much more. It is also simple to set up multiple screens and have the software cycle through them all.
|
|
 |
|
|
I have not had any crashes or issues with the CrystalControl software in my use of this LCD, and I can wholeheartedly recommend this LCD and software to someone who is new to LCDs and doesn't want to have to do a lot of work to get their display up and running.
|
|
|
Temp reading goodness  |
|
|
|
| Random Forum Pic |
 |
| From Thread: Is this how you bleed a system with a T line? |
|
| | ProCooling Poll: |
| So why the hell not? |
|
I agree!
|
 67% 67%
|
|
What?
|
 17% 17%
|
|
Hell NO!
|
 0% 0%
|
|
Worst Poll Ever.
|
 17% 17%
|
Total Votes:18Please Login to Vote!
|
|