|
|
|
|
 Pro/LAN Pro/LAN
|
|
Date Posted: Oct 21 2002
|
|
Author: pHaestus
|
|
|
|
|
Posting Type: Article
|
|
Category: ProCooling Projects
|
|
Page: 2 of 5
|
|
Article Rank:No Rank Yet
Must Log In to Rank This Article
|
|
|
|
|
Note: This is a legacy article, imported from old code. Due to this some items on the page may not function as expected. Links, Colors, and some images may not be set correctly.
|
|
|
Pro/LAN By: pHaestus
|
|
|
|
I personally find adding water cooling to smaller cases to always be interesting due to the tradeoffs and compromises that have to be made. There is simply no way that one can find the space to add a radiator and pump into the PC-50 without taking SOMETHING out. So the first step in setting up the cooling system was to choose the parts that I was going to use. Let's take a closer look at each component.
|
|
|
|
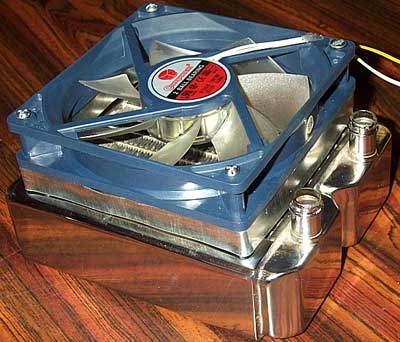
Radiator- The radiator that was used for the case was the Black Ice Extreme. I was fortunate enough to get one of the first chrome-plated revision2 Black Ice Extremes. This radiator was chosen because it has relatively low restriction when compared to the original 4 pass Black Ices, it has a fairly dense fin placement (therefore more surface area for cooling), and most importantly I could fit it into the case. The other radiators I was considering were the Dangerden or Becooling cooling cube type radiators. I went with the BI Extreme because I could mount it on the bottom of the case and avoid having to modify the front bezel for improved airflow.
|
|
|
|
|
|
One change I made on the Extreme was the addition of a 0.5" aluminum shroud. It was very simply put together from a 0.5" wide strip of aluminum flashing and a pop rivet. A shroud is really a must on radiators because it improves the fan's performance and lowers the noise levels. If space had not been a concern, an even larger shroud would have been used. I mounted the fan "pulling" air through the radiator because it was noticeably quieter than when "pushing" air into the rad. Cooling performance may have slightly been compromised by this choice, as air is usually laminar on the intake side of a fan and turbulent on the exhaust side.
|
|
|
|
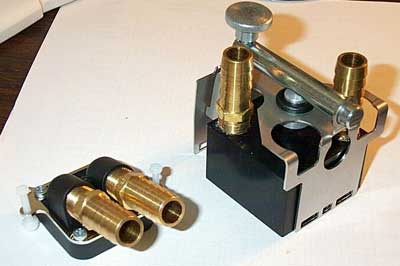
Waterblocks- For this system, I opted to use the Innovatek rev3 CPU block and the Innovatek GPU cooler. The CPU block was chosen due to its excellent performance at lower flow rates and its distinctive (and effective) mounting clip. The Innovatek GPU block was chosen after reading a review at Overclockers where it performed on par with CPU waterblocks. The GPU block is also much lower resistance than the original Dangerden GF3 block, which was the other popular choice when I purchased my GPU cooler.
|
|
|
|
The Innovatek blocks ship with relatively small ID (8mm) fittings designed for securely locking the tubing into place. I was concerned about maintaining a reasonable flow rate throughout the blocks and so I replaced the stock fittings with ¼" NPT x ½" barb fittings. For the CPU block, this involved a bit of force because the threads weren't exactly the same. It was nothing that a bit of Goop and a wrench couldn't cure, however.
|
|
|
|
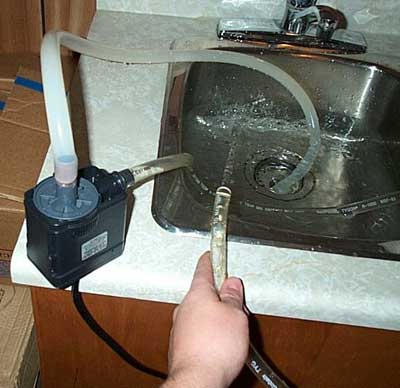
Pump- When I initially chose the Innovatek blocks, I was planning on using an Eheim 1048 pump. However, that pump is currently in my AquaXtreme Barebones system. I didn't want to cannibalize that system, so I had to go looking for another pump widely available in Canada. I settled upon the Laguna Statuary pump Model 3 (http://www.hagen.com/pdf/ponds/Laguna_Statuary_Pu mps.pdf ) for its size and price. The Laguna pump is technically a submersible unit, but with a bit of Plumber's Goop on the outlet barb and a piece of ½" copper tubing Gooped into the inlet it was airtight when inline. The pump is 360 GPH and only 19W. It is also a good bit smaller than Eheim pumps though it is rather tall. So far, it has been a reliable pump with excellent flow.
|
|
|
|
The only other parts of note in the water cooling loop are a mix of 3/8" ID and ½" ID thick wall silicone tubing, a few 5/8" x 1/2" T connectors (for a fill tube and for inline thermistors), and an assortment of hose clamps.
Fans. All of the fans used in the case are blue Enermax variable speed fans. The fans offer a range of noise and performance levels and the 120mm fan in particular is a very good choice when space is at a premium. I am not so impressed with the potentiometers' physical shape, as they are a bit of a pain to turn. I also feel obligated to give Enermax minus 100 points for not posting P-Q curves for their fans on the website.
|
|
|
System Design and Installation
|
|
|
|
I kicked around quite a few ideas before I decided to mount the radiator on the bottom front of the case. The major reason for this position was the ability to cool the radiator with cool outside air without having to hack up the case in a noticeable way. The drawback is that this mounting will probably result in more frequent dustings.
|
|
 |
|
|
|
|
|
|
|
|
This strategy also meant that I would need to also add casters to the bottom of the case. The casters will raise the case off the ground enough to get sufficient air intake for the radiator.
If I had just a little bit more space in the front, I could have mounted the Black Ice Extreme in an upright position. As it stands, though, there was no way to do this without cutting up the drive cage. I suppose I could have mounted the radiator sideways up front, but I was concerned about some potential problems. First of all, I figured that air might tend to collect in the top of the radiator with this sort of mounting. Additionally, I knew that mounting the radiator on the front of the case would mean that the bezel would need to be hacked up for improved airflow. It would have been possible to mount the radiator in the top 2 5.25" bays instead of the PSU, but then I would have needed to use a 1U PSU placed behind the upper 3.5" cage. I also don't especially like radiators placed on the top of cases being cooled by hot case air. So mounting the radiator on the bottom of the case suited my needs best.
To fit the radiator and pump, the lower hard drive cage had to be removed. This was no effort other than removing a few thumbscrews and unscrewing the rails from the case frame. Once that was done, a hole for the radiator was needed. I used a dremel for the cutting.
I managed to end up with a nice clean hole. It was at this time when I mounted the casters for the case as well. I used the Lian Li locking style casters, and I simply JB Welded them in the position I wanted. I highly recommend adding casters if you are looking for a good modification to do to your case (water cooled or not).
|
|
|
Installing the cooling system. Once I had the parts chosen and the radiator hole cut out, it was time to install the cooling loop. This was the one point in the project where I made an obvious mistake. I used double-sided tape to affix the radiator to the case. I knew when I did it that it wasn't a good idea, but with the casters there wasn't a way to bolt it onto the frame. When I filled the system, I quickly realized that it would have been MUCH easier if I had used Velcro tape. Then, I could have simply pulled out the rad to shake any air out of it. Similarly, I mounted the pump to the case by using several thicknesses of double-sided foam tape and foam wrapping to dampen the vibrations of the pump. This actually worked pretty well; after the system bled of air then it was pretty quiet. The Laguna is a bit noisier than my Eheim, however.
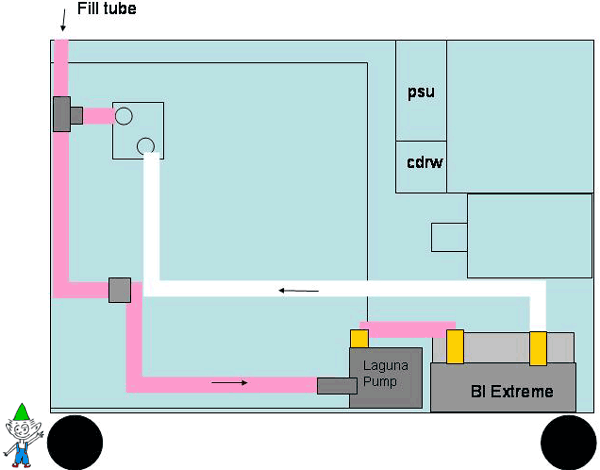
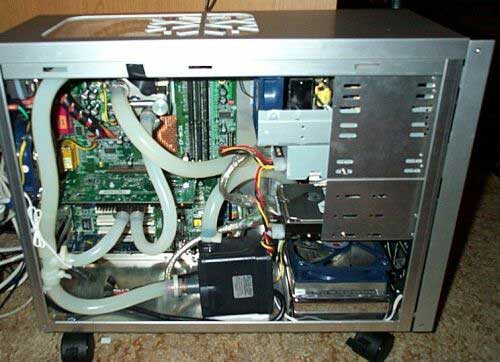
With the pump and radiator mounted, I next connected all the tubing and tightened down hose clamps. I was forced to use 3/8" silicone tubing for the hoses that connected to the GPU block because I couldn't get hose clamps around the ½" thick wall silicone on that block. Everywhere else I used my favorite: thick wall ½" silicone tubing. For the "T" connector I used a 5/8"x ½" x 5/8" nylon connector. When I was finished, the system looked like this:
|
|
 |
|
|
I still am not completely satisfied with this configuration. I would really prefer to get rid of that 90 degree turn at the "T", but I haven't come up with a good strategy to do so and keep all of the tubing out of the way. The advantage to the placement of the "T" is that it is quite easy to fill the system. The drawback was that it took a long time (about a day) for the air to bleed out of the system. I am thinking about adding a small reservoir to the loop in the near future to improve the bleed time.
|
|
|
Now for all the additional mods to the rig  |
|
|
|
| Random Forum Pic |
 |
| From Thread: Tygon/clamps, getting chewed up... |
|
| | ProCooling Poll: |
| So why the hell not? |
|
I agree!
|
 67% 67%
|
|
What?
|
 17% 17%
|
|
Hell NO!
|
 0% 0%
|
|
Worst Poll Ever.
|
 17% 17%
|
Total Votes:18Please Login to Vote!
|
|