|
|
|
|
 Little Stealth 2 Little Stealth 2
|
|
Date Posted: Mar 18 2001
|
|
Author: Unaclocker
|
|
|
|
|
Posting Type: Article
|
|
Category: ProCooling Projects
|
|
Page: 2 of 4
|
|
Article Rank:No Rank Yet
Must Log In to Rank This Article
|
|
|
|
|
Note: This is a legacy article, imported from old code. Due to this some items on the page may not function as expected. Links, Colors, and some images may not be set correctly.
|
|
|
Little Stealth 2 By: Unaclocker
|
|
Project : Little Stealth II
|
|
|
|
|
Front mounted USB Ports
|
|
|
|
 |
|
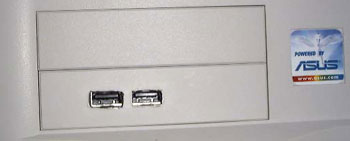
Asus ships an expansion plate (for lack of a better name) with 2 extra USB ports on it that normally goes into one of the slots in the back of the case. This is nice, most people can live with 4 USB ports and not need a hub. But you still have to crawl under the system to plug things in, which is a total pain. Now Compaq and other OEM's have USB ports on the front of the case, this is an awesome idea, and really needs to become part of the ATX standard so that the rest of us can do that. But for now, The first thing I did was pull out one of my 3.5" blank covers. I compared the size of the circuit board the 2 USB ports were on to the 3.5" cover, excellent fit. To make things easier, I decided to use the metal of the expansion slot cover, so that I'd have a simple way to hold the PCB to the cover. I cut the top and the bottom off the metal plate to get it down under 3.5". I then removed the PCB from the plate, and set the plate onto the 3.5" bay cover, and marked out the 2 holes with a marker. Then I used a utility knife to cut out the holes for the USB devices to plug in through. Not the cleanest cut, but definitely better than many I've seen. I then liberally applied epoxy to the 3.5" bay cover, and placed the metal plate onto it, and then added a bit more so that the plate would be well secured.
|
|
|
|
 |
|
|
|
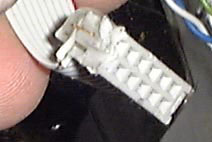
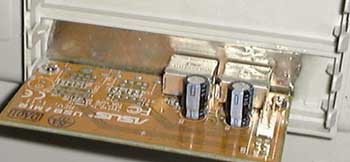
After the epoxy cured, I re-attached the PCB to the metal plate, and I had my front mounted USB ports. Unfortunately, I still had one more problem. The cable Asus provided wasn't long enough. Although it could reach, it could only do it via a straight line, not exactly a nice looking way to run the cable. So I grabbed my box of IDE and SCSi cables, and started comparing. I found one that was a good 4" longer, and took it over and clamped it in a vice. I counted the number of pins I needed (10 if I remember right), and used a hacksaw to cut off the extra 30 pinholes on the cable, at both ends, and split the ribbon right at 10. Now the connectors on the end are not designed to be cut like that, so I reinforced them with a liberal coating of epoxy.
|
|
|
|
|
|
After all was said and done, it turned out great. I can now plug my steering wheel into the front of my computer, or any other device that I need to plug in and unplug often. Things like my printer and mouse plug into the back of the computer.
|
|
|
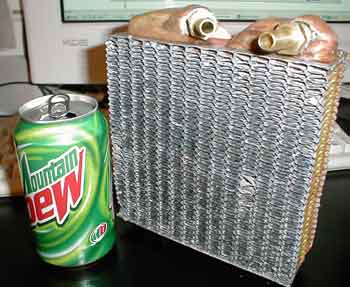
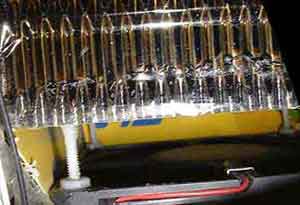
The Bigass Big Momma Radiator - Dew Can Optional.
|
|
|
|
|
|
Front
|
|
|
 |
|
|
|
|
|
|
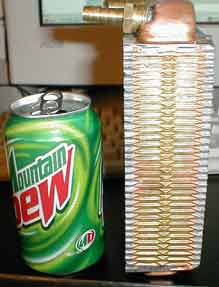
Side
|
|
|
 |
|
|
|
|
Why Yes, that IS a kink in the hose there. Water flow is reduced a little bit, but not enough to effect temperatures. The fitting coming out of big momma is JB Welded in, so I couldn't change it. I fiddled with that small 1" of hose for ages, and finally just decided the kink was a necessary evil.
I previously had a blue TBird 1000, but was not happy with it, so I sold it. One thing I found while running the TBird at 1.2 and 2.05v was that the little 4x4" Best radiator I had was struggling to displace the heat from the CPU. So I have moved up to a MUCH bigger radiator. The "Big Momma" from OCWC, I'd say it's easily twice as large, and maybe 3 times as large, and is just crammed full of fins. The Big Momma is the primary modification I've done to project little stealth, I feel it is a fundamental change from the old setup, it's like a heart transplant, even more than the CPU and motherboard were. (Call those a brain transplant, but still not very important)
|
|
|
|
|
|
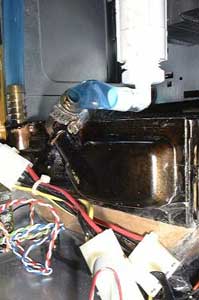
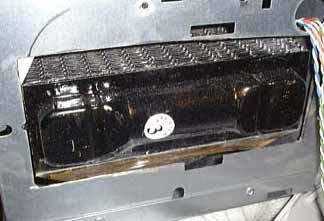
The Big Momma measures 6"x7"x2". The space I had to work with was EXACTLY 6"x7", and I after installing an elbow in the output of the pump, I had about 3" between the top of the fan and the bottom of the pump. Well I wanted to mount the radiator opposite of the way it fit, I wanted to mount the radiator at 6x7 in the space of 7x6.. So I had to do some cutting to make it fit properly. What I did was cut an opening in the metal of the front of the case, so that part of the radiator is tucked inside the plastic faceplate of the case (gotta use that blank space for SOMETHING, right?). I then tore the system down, and cut the opening in the front of the case, I wasn't going for exact measurements, as you can see from the picture. The hole ended up being much larger than I needed. I also managed to preserve the case's structural integrity. After getting the hole cut, I put the fan back into the case, and started lining up the radiator, to see exactly how it turned out, and where would be best to mount the radiator.
|
|
|
|
 |
|
|
|
The other thing I wanted to do was hold the radiator up off of the fan. There are alot of reasons for doing that. First of all, at the center hub of the fan, no air flows through that area, that's a good 50mm of the radiator that's not getting any airflow at all if you have the fan bolted up directly to it. I also had the obvious fact that a 120mm fan is about 40mm smaller on all sides than the 6" radiator (Hey look, I pulled a NASA, and used metric and American in the same sentence). I spent a day or two thinking about how I was going to hold the radiator above the fan, then I noticed some old nylon screws in my junkbox, left over from my old peltier/athlon classic attempt. Perfect! They are about 1" long, 8-32 threads,and I still had 4 nylon nuts for them. If I put the nut on them, they could sit on the screw-holes on the fan, and hold the radiator up with their heads. That was perfect, so I did a test fitting to see just how much I could comfortably have them stick up. Turned out 7/8" was about perfect, so I twisted the nuts on all of them up about 1/8", grabbed some epoxy, and epoxied them into the 4 holes in the fan. After they had completely dried, I did some test fitting of the radiator, finding the optimal orientation, and making my final decision on where to put the radiator in relation to the motherboard, and the hole I had made. I noted where the heads of the screws were in relation to the fins on the radiator, and then pulled the fan back out of the case. I laid the radiator down, and carefully placed the fan down on it, making sure the heads of the nylon screws were where I had noted. Then I mixed up a large batch of epoxy, and coated the heads of the screws very well. This is where the 5 minute epoxy came in very handy, as I was finishing the last bolt head, I noticed that most of the epoxy I had put on the first bolt had oozed down inside of the radiator. This was not good, so I grabbed the radiator and fan, carefully holding them tight to each other, and flipped it over. The epoxy oozed back out slowly and hardened flawlessly. An hour or two later I was able to pick up the radiator with the fan, more than strong enough for my needs.
|
|
|
|
|
|
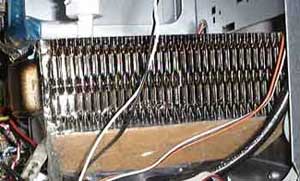
The Ducting
|
|
|
 |
|
|
|
|
|
|
The Nylon Stands
|
|
|
 |
|
|
|
|
Now I had the first part of my goals down, I had the radiator held securely over the fan. Now I needed to work on ducting between the fan and radiator, I needed to go from 120mm to 6" in a 7/8" space, and to top it off, the fan was not centered on the radiator, so each side of the duct would be different. I cut up an old motherboard box, and made 4 trapezoids - 120mm at the top, 6" at the bottom. Unfortunately, they all turned out to be wrong because the fan wasn't centered, but a little work with the scissors got them all lined up. The hard part was getting them to stay in place while I taped them. I used packing tape to attach them and to seal them so that air would be forced through the radiator. Turned out rather nice.
How does she perform? Well, my old 2CoolComputer waterblock that was performing no better than a FOP32 on my old Duron, turns out that had alot to do with the 4x4 radiator I had. The 2Cool block on my TBird 750 at 1.1GHz/2.4v (101watts of heat) did excellent, it easily pulled as much heat as the CPU could give it and cooled it. Big momma wasn't even warm to the touch. I didn't have a core temp probe at the time, but the socket probe on my A7V (which reads about 10f high from what I've seen with the core temp probe) said the temp was 118f, awesome considering the radiator is small enough to fit into a mini-tower case. With the old 4x4 radiator, the block and the radiator itself would get warm to the touch, and that was just a Duron at 1000/2.3v, barely 70watts of heat.
|
|
|
|
| Random Forum Pic |
 |
| From Thread: CyberDruid Aquatronic |
|
| | ProCooling Poll: |
| So why the hell not? |
|
I agree!
|
 67% 67%
|
|
What?
|
 17% 17%
|
|
Hell NO!
|
 0% 0%
|
|
Worst Poll Ever.
|
 17% 17%
|
Total Votes:18Please Login to Vote!
|
|