|
|
|
|
 Little Stealth 2 Little Stealth 2
|
|
Date Posted: Mar 18 2001
|
|
Author: Unaclocker
|
|
|
|
|
Posting Type: Article
|
|
Category: ProCooling Projects
|
|
Page: 3 of 4
|
|
Article Rank:No Rank Yet
Must Log In to Rank This Article
|
|
|
|
|
Note: This is a legacy article, imported from old code. Due to this some items on the page may not function as expected. Links, Colors, and some images may not be set correctly.
|
|
|
Little Stealth 2 By: Unaclocker
|
|
Project : Little Stealth II
|
|
|
|
|
|
|
|
|
|
 |
|
|
|
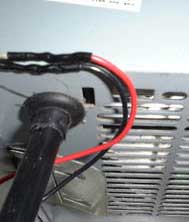
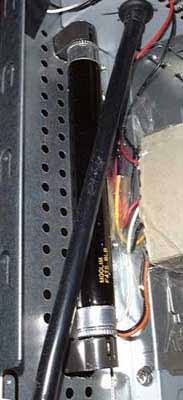
Another modification I made, was done right after I got back in town from visiting relatives for Christmas. I wired the pump into the ATX power supply. Primary reason I did this was because I grabbed my computer out of my car, shut the door, and started walking towards my friend's house, and just about tore the computer out of my arms when the power cord for the pump went taught (shut in the car door!). So now the power cord for the pump runs along the bottom of my case and up the back in through a grommet into the power supply, where I soldered it to the toggle switch in the power supply. I no longer have to worry about the pump not being on when the computer is, and I don't have an extra cord hanging out the back of the system. I recommend this mod, but only if you take proper precautions, your dealing with AC, not DC, and 120v, not 12v.
|
|
|
|
|
 |
|
|
|
|
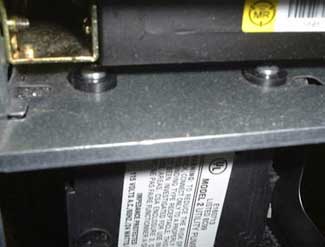
Oh, and I've put some foam, and rubber between the pump, and the metal of the case now. I was having a horrible time with vibrations transfering from the pump to the case. The pump is normally almost silent, but it has a strong low frequency buzzing. When that buzz gets transfered into the frame of the case, it starts reverberating. Everything starts rattling!
|
|
|
|
|
|
|
|
|
Hose Routing
|
|
|
|
 |
|
|
|
|
One thing alot of people mentioned about the original little stealth was the crappy hose routing I did. I knew it sucked, I hated it myself. Just turned out to be function over form. After several months to think it over, I came up with an excellent new way to route my hoses. Of course, I can't take all the credit here, it just happened that Big Momma's fittings were pointing exactly where they needed to. The output from the pump travels through about 1" of hose and then goes directly into the radiator. After the water makes the 2 passes through her, it exits straight up out of the radiator. This turned out to be excellent, I have a line that travels straight up next to the edge of the motherboard till it gets to the level of the waterblock, where I installed a T. I have a line that continues straight upward for the air trap,
|
|
|
|
|
|
and another line that takes a left at the T and runs directly to the waterblock. Finally, a line runs directly back from the block to the intake on the pump. Simple, direct, and neat, I'm quite pleased with how that turned out also. Of course, I covered the routing of my hoses in more depth in my last article.
|
|
|
Air Duct
|
|
|
|
|
|
|
And finally, even though this was probably the first mod I made after completing my last Little Stealth article, I installed a voltage regulator airduct. Of course, I wrote an article covering this too. Simply put, I wanted to insure that the voltage regulators did not overheat and cause any instability or burn out prematurely. Of course, I had planned for this air duct originally when I first started chopping up Little Stealth; I just hadn't decided how I wanted to go about making the duct. Ended up using poster board. You can see more about this here. But the air duct came in handy for my next mod.
|
|
|
|
|
|
|
|
|
|
 |
|
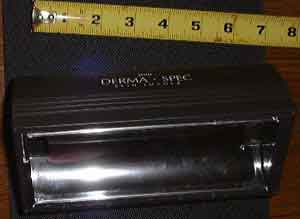
I picked up an awesome little blacklight. It uses a 5" flourescent tube, and is designed to run off 12v DC. Just perfect. It originally came in this huge plastic case.
|
|
|
|
|
|
 |
|
|
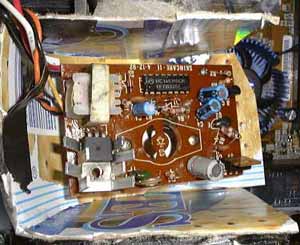
That's about 3"x3"x7", just too big and ugly for my case. It was also originally designed to run for 1 minute, and then shut off. So the first thing I needed to do was mod the circuitry to kill that timer. The site I found that explained how to do that also mentioned that the circuitry would overheat if run for extended periods of time. I had originally planned to mount a 40mm fan on the circuitry to keep it cool, but I didn't want to have that ugly little PCB laying around my case looking bad either. Then I remember my good old airduct. Perfect! I pulled off my airduct and did some test fitting, it couldn't have fit better if it had been designed that way!
|
|
|
|
|
|
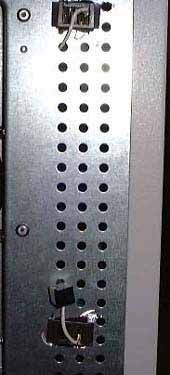
I just needed to extend the wires, and find a way to get the board to stay still inside the duct. I ended up using some of my good old epoxy to mount the board. I got power for the circuitry from the fanbus powering the airduct, I just made sure to get the ground from the side of the case, because the ground wire switches between ground and 5v, to slow down my fans. I also needed to wire in a switch, originally there was a switch attached directly to the circuitry of the blacklight, I needed a remote switch, so I yanked an old turbo button out of one of my old cases and I use that to turn the light on and off. Now came the other issue.. What to do about getting the bulb out of the big plastic box it was mounted in. I noticed that the tombstones (that's the name of the sockets a fluorescent bulb screws into) were removable, so I popped them out. I used the open holes in the top of the plastic case to mark where I needed to make similar holes in the back of my case.
|
|
|
|
|
|
|
|
|
|
 |
|
 |
|
|
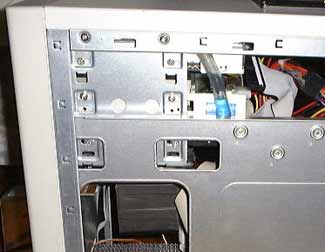
Then came my trusty dremel tool, I cut 2 square holes, and fit the tombstones in through those 2 holes. It turned out just perfect, the bulb screwed in just fine, and hardly takes up any space at all now.
|
|
|
|
|
Blue Dye-Lite
|
|
|
|
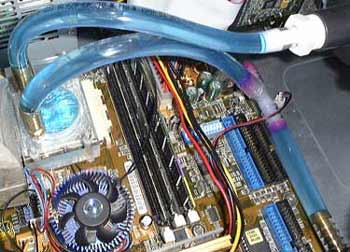
This is the great Dye-Lite that OverClock-Watercool sells, in my tubes, and under a blacklight. Now you see why I needed a blacklight mounted in my case. This shot was taken while the system was running. Not a whole lot to say about this stuff. It's supposed to take 1 drop to make 1 gallon of water glow bright blue like this. I accidentally added a bit more than that. I also used food coloring to make my hoses blue in the daylight, because they didn't look blue at all in daylight with just the dye-lite in them. I'd show a picture of the waterblock glowing, but the airduct casts a shadow on the block. Ooopsie.
|
|
|
 |
|
|
|
I had needed this mod for ages, my fans were driving me nuts at night, and when I was trying to watch TV. Generally, any time I'm not playing games or encoding DiVX, I don't need my fans running full tilt. Now the way a 7v/12v switch works is you switch the ground leg of a fan from 0v DC (the black wire) to 5v DC (the red wire on a molex), since the 12v isn't running to 0v anymore, it's running to 5v, the voltage difference is 7v, and the fan runs just shy of 50% slower. The nice thing about 7v as opposed to 5v is that almost any fan will run at 7v, and will start from a dead stop at 7v, whereas most fans have trouble winding up from a dead stop at 5v, and some won't spin at all. Now I had meant to do this ages ago, but my budget has been tight, and everytime I score some money, I forget to buy them. Well one night as I was moving my Linux box to a new case, I noticed the long unused turbo button! So I quickly yanked that out, noticing that it was a 3 conductor switch. 1 pole is common, and switches between the other two wires. So I ran that common pole to the black wire on my fan/fanbus, and ran one of the other wires to the black on my molex, and the last wire to the red on the molex. A little quick test told me that the switch had no problem handling the load of the fans. So I soldered it up and used some shrinkwrap to tidy up the look a bit. Now the turbo button wasn't exactly designed to be mounted anywhere other than behind the plastic faceplate of a case, but a button molded into the front of that case.. I couldn't do that with this one, so I just ran the wires out the hole that big momma sticks out of, and have the wire dangling out the bottom of the plastic faceplate of the case. You can't see the switch, but if I reach up under the bottom front of the case, I can easily press the button. Works great until I can get a normal switch to mount in the front of the case, and I can finally quiet my system down, temps tend to be about 5-10f warmer with the fans at 7v.
|
|
|
|
|
|
| Random Forum Pic |
 |
| From Thread: New guy with my waterblock idea |
|
| | ProCooling Poll: |
| So why the hell not? |
|
I agree!
|
 67% 67%
|
|
What?
|
 17% 17%
|
|
Hell NO!
|
 0% 0%
|
|
Worst Poll Ever.
|
 17% 17%
|
Total Votes:18Please Login to Vote!
|
|