|
|
|
|
 Useful Tips for Water Coolers Useful Tips for Water Coolers
|
|
Date Posted: May 24 2003
|
|
Author: pHaestus
|
|
|
|
|
Posting Type: Article
|
|
Category: FAQ's, Editorials, Q&A's
|
|
Page: 1 of 1
|
|
Article Rank:No Rank Yet
Must Log In to Rank This Article
|
|
|
|
|
Note: This is a legacy article, imported from old code. Due to this some items on the page may not function as expected. Links, Colors, and some images may not be set correctly.
|
|
|
Useful Tips for Water Coolers By: pHaestus
|
|
|
|
|
Some Useful Tips and Tricks for Water Coolers
By: Derek Peak (pHaestus) 5/24/03
|
|
|
|
|
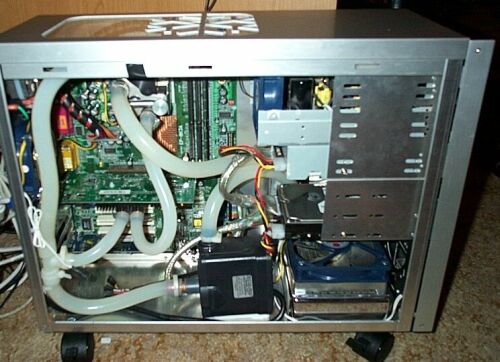
When I built my PC-50 as a water-cooled gaming system, I knew that I had to make some sacrifices in noise and performance to squeeze everything into a mini/mid tower case. The thought was to put together an impressive water cooled box for LANs. The Pro/Lan project certainly managed that; it looks great and everyone who comes over comments on how unique and attractive that the system is. But (yes there's always a but) the box really wasn't intended to be used as a family computer 24/7 in a quiet environment. It has turned out to be my main gaming box and file server as well as the PC my wife uses all the time. You may have seen the internal layout before:
|
|
|
|
 |
|
|
|
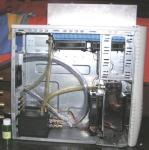
From the beginning I was unhappy with the hose routing and "T" for filling but I didn't have any other bright ideas. I knew that the combination of lots of bends, a CPU Waterblock, and a GPU Waterblock meant that I wasn't going to achieve very high flow rates. Accordingly, I chose a CPU block (innovatek rev3) that performs well at lower flow rates through the system. As is typical with overclockers, I wasn't satisfied with the PC-50's cooling after a while. Sure it worked, but I was seeing CPU temperatures that were in the upper 50C when overvolted and overclocked. Too hot for my taste. Since I had a spare case lying around the house, and spare cooling parts, I decided to build an extremely optimized loop for CPU cooling only and move the PC-50s system over to the new case.
I wasn't planning on even writing this project up, but I did a few little things in this box that may be of practical interest to you guys. So rather than taking the time to record everything in detail as a huge project, I thought I would just present the interesting things that I did to get the new system running that might be of significant use to others. Some of these are pretty introductory and common sense, but hopefully a few of them will be of interest to the more seasoned readers as well.
|
|
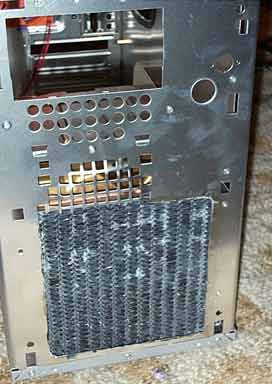
Tip 1. Radiator Placement is important. I am certain that this is not news to most people, but I still see a lot of radiators mounted in the top of the case where the air is typically somewhat warm and stagnant. I always mount my radiators so that they get unrestricted access to fresh outside air on the intake side. I found with the AquaExtreme case review that high water temperatures were compromising the cooling performance. The Black Ice Pro mounted on a blowhole was a decent radiator, but the air in the top of the case was 5C warmer than the outside air and this hurts the water temperatures. In this case, I cut a large hole in the lower front of my case and then placed a chevette heater core in the hole so it gets plenty of cool outside air.
Does this mean that the top of cases should never be used for radiators? No, but one should think seriously about airflow and temperature differentials before going that route. I have seen users who mounted their radiators on the top of the case but used ducting to still route fresh outside air through the radiator. Others have mounted their radiators at the top rear and then ducted air from the top of the case to the radiator. There are many solutions, but the most important design parameter from a performance standpoint is to get your radiator the coolest air possible.
|
|
|
|
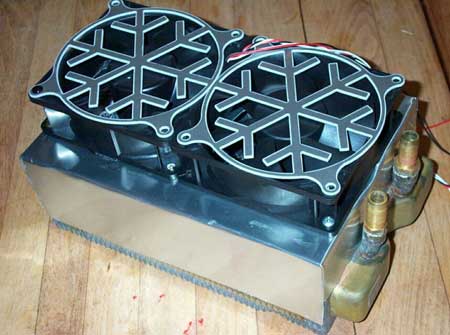
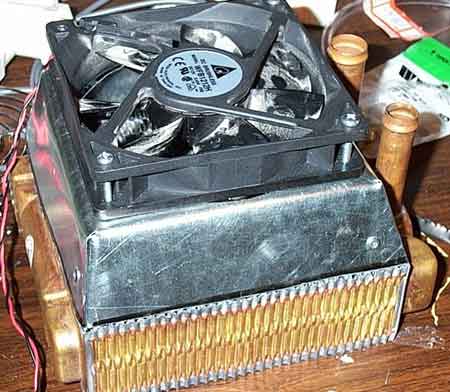
Tip 2. Shrouds are NOT optional. Normal axial fans do not perform well with a restriction on either the intake or exhaust side. Mounting a fan directly on a radiator is a recipe for noise and poor performance. A shroud can be constructed by anyone for little to no money. A shroud can give the fan enough space to perform with decreased noise and increased performance. There is not always room to do this on heatsinks, but there is no excuse when mounting a radiator. The extent of the problem depends on the fan and the radiator that is used, but the need for a shroud on radiator fans is universal. You can find P-Q curves for fans with obstructions at different distances from the intake and exhaust side here (page 3) . I build custom shrouds out of aluminum flashing for my shrouds. It only requires a T Square, a Sharpie marker, some scissors, and some method to tie it all together. I use a pop rivet gun, but superglue or epoxy or even duct tape works. If you can't be bothered to make aluminum flashing shrouds, then use cardboard. But don't skip this step as it is absolutely vital to the performance of your water cooling loop. Here are a couple of my finished shrouds on different radiators:
|
|
Tip 3. Motherboards need renovation. This is a trick I picked up from eyecannon back when I first started using a Maze2. I love using the 4 socket holes to mount waterblocks, but I hate having to pull out the motherboard to change blocks. Another problem with some blocks (Maze 2 for example) is that sometimes one of the barbs is close to the mounting holes and makes getting even tightening of the springs difficult. So I cut a rectangular hole in my motherboard tray.
|
|
|
|
That way I can change out blocks with no trouble at all. For blocks that use long bolts, I also mount them "backwards" using the springs on the backside of the motherboard. As long as you use 2" bolts then you can still close the side panel, and I find that even tightening is much easier without having to hassle with the hoses. Give it a try; this method works much better than the traditional way. You might want to make a nonconductive plate to spread out the pressure over a much larger area as well.
|
|
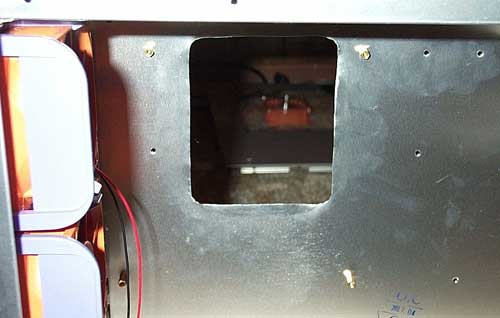
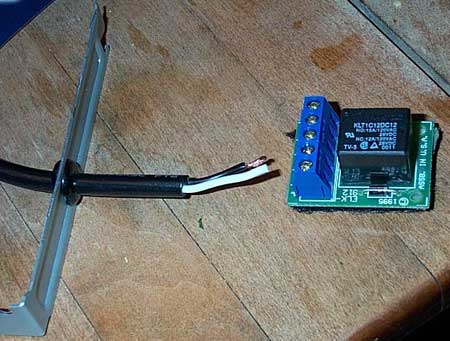
Tip 4. PCI slots are good places to route pump wiring. My dremel recently broke, and so I have been making do with tin snips, a drill, and my wits when setting up systems. I usually cut a little hole for a second power plug and wire the pump in like that. However, I came up with a neater solution the other day. I drilled a hole through a PCI slot cover and then put a rubber grommet in it. Then I cut my pump's power cable and routed it through the PCI slot cover. I had a Swiftech pump relay system lying around, so I also used that. Here are the parts:
|
|
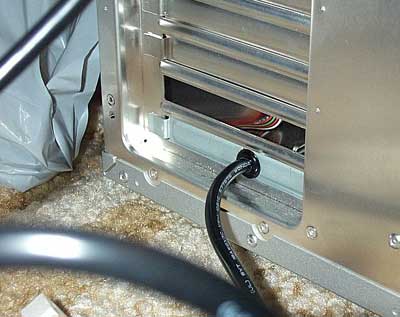
If you don't want to use a relay, then you could just get some quick crimp spade connectors to connect the pump's wires to the power cable. Here is the final product from the rear:
|
|
|
|
Much cleaner than cutting another hole and adding a second plug on the back in my opinion.
Hopefully you guys find at least one of these comments to be of some use in your own systems. If you have any questions, comments, or tips of your own then by all means post them in the forums or drop me an e-mail.
|
|
|
|
| Random Forum Pic |
 |
| From Thread: Dual Loop ready and running |
|
| | ProCooling Poll: |
| So why the hell not? |
|
I agree!
|
 67% 67%
|
|
What?
|
 17% 17%
|
|
Hell NO!
|
 0% 0%
|
|
Worst Poll Ever.
|
 17% 17%
|
Total Votes:18Please Login to Vote!
|
|


