|
|
|
|
 pH's Waterblock Comparison pH's Waterblock Comparison
|
|
Date Posted: Feb 1 2004
|
|
Author: pHaestus
|
|
|
|
|
Posting Type: Review
|
|
Category: H2O and High End Cooling Reviews
|
|
Page: 1 of 2
|
|
Article Rank:No Rank Yet
Must Log In to Rank This Article
|
|
|
|
|
Note: This is a legacy article, imported from old code. Due to this some items on the page may not function as expected. Links, Colors, and some images may not be set correctly.
|
|
|
pH's Waterblock Comparison By: pHaestus
|
|
|
|
|
pHaestus' Waterblock Comparison
By: pHaestus 2/01/04
|
|
|
Waterblock testing has been an expensive and frustrating hobby of mine for several years. My testing equipment and technique is now to the point that I
feel comfortable in posting results for our readers. I am still upgrading and changing test equipment constantly, and hopefully I will complete my die simulator in the next few months.
In the mean time, I am doing the best that I can with what is at my disposal. I hope that the results may prove interesting to both potential buyers and DIY waterblock designers.
Today the topic for review are three well-regarded performance waterblocks from Dangerden, Dtek Customs, and Little River. I want to be up front about the
source for each of these blocks, as there is a concern in the back of my mind that manufacturers could easily tweak a waterblock for better-than-typical performance during a review.
The baseplate could have a better finish, for example, or a newer revision could be sent than is currently stocked by webstores. In this case, the Little River Cascade was purchased directly from Cathar with the knowledge that it would be reviewed. The DTek Whitewater was provided by nikhsub1, a Procooling reader, and the Dangerden RBX was provided by Cooltechnica from their normal stock.
|
|
|
|
|
|
|
|
|
|
 |
|
|
|
 |
|
|
 |
|
|
|
|
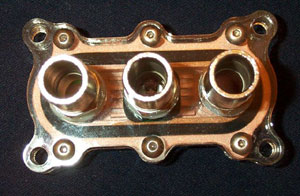
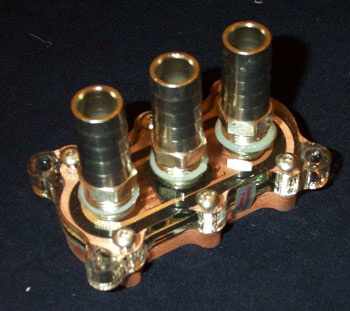
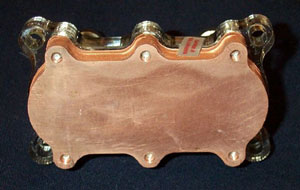
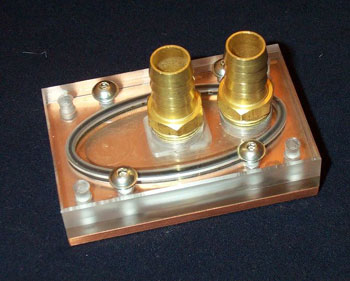
The RBX is a single inlet, dual outlet waterblock that uses a combination of die impingement and multiple channels for water flow.
One of the unique features of the RBX is its adjustable nozzle; the standard (#1) nozzle was tested in this review. Here's what Dangerden had to say about the design:
"The Danger Den – RBX is a design that has been in the R&D stage for quite some time. The goal is to offer an extreme product that provides top tier cooling
and allows the user to tune the block, all at a reasonable price.
Many different important design features are incorporated into the Danger Den - RBX to achieve this.
- One (1) Center Inlet and two (2) Outputs – The center inlet is designed to get the lowest temperature water directly
to the CPU core area. The dual water outlets allows for faster water transfer across the CPU core area preventing excessive water temperature increases and stagnant or laminar flow.
- Acceleration Assembly (nozzle) - A neoprene gasket is used to force water from the fitting to the block base without
any "blow by". This design allows for customizing of the acceleration assembly by the end user. A package of various acceleration assemblies can be purchased with the block.
Each end user can "tune" the block to best fit their system.
- Internal Channels – Six (6) channels are machined into the base of the block. The nozzle assembly is fixed in place
by the top of the channels. Turbulent flow is enhanced by the "wave" channel wall design in the center of the block. Base thickness is approximately 0.05" (1.27mm).
- Heat Voids - 45 heat voids are machined in the base near the nozzle area. These voids help maximize the water
impingement in this style of block design. The base thickness at the bottom of the void is approximately 0.025" (0.64mm)."
- DangerDen
|
|
|
|
|
|
|
|
|
 |
|
|
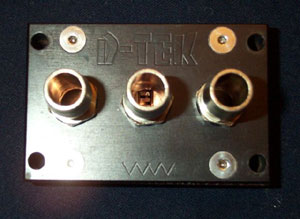
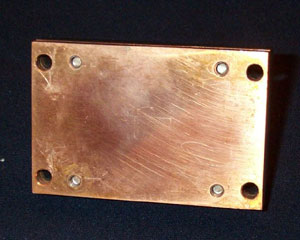
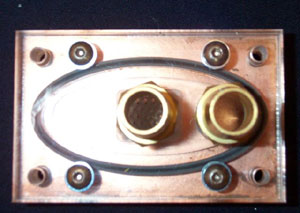
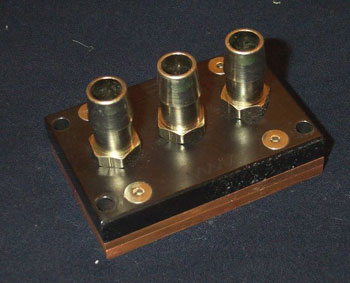
The DTek Whitewater uses the tried and true design developed by Cathar.
It is a single inlet, dual outlet waterblock that was the first to incorporate the combination of mini channels and a nozzle to manipulate water velocity and placement in the block. Here are Cathar's comments on the White Water design (from Bill Adams' Whitewater review):
|
|
|
|
|
|
"The White Water block started as a DIY project. The design evolved out of a desire to discover if water-block design technology had reached a limit. My
design goals initially were purely to discover if a block could be made using conventional machining technology that would outperform commercial water blocks on the market at that time (Aug '02).
To aid in this matter I
wrote a water block thermal simulation application which enabled me to explore the pros and cons of various designs, and make changes to designs easily to see what effects resulted. Compared to modern CFD simulators the
application is a toy, but it did the job well enough.
Over time a pattern of desired design criteria began to emerge:
- High water velocity can be even more important than high water volume, even if it means making the block somewhat
restrictive by some standards.
- The bulk of the heat does not spread laterally very far from a CPU die so there is little point in attempting to
cool the edges.
- Total surface area directly above the CPU die is very important, to a point.
- Water forcibly striking the area directly above the CPU die is very important.
- The copper base-plate should only be thick enough to transfer heat as quickly as possible to a larger surface area
where it can be dissipated.
I arrived at an initial design that differs not too greatly from what the White Water is today. The biggest task was getting the block made and the not
inconsiderable sum of money paid to professional machinists to make it as I had no machining experience of my own. It was a big leap of faith. Several revisions later, and with the addition of the middle plate slot nozzle
to boost water velocity striking the area directly above the CPU die, the White Water was born, a block which I felt satisfied all of the defined design criteria."
-Cathar (Stew Forster) of Little River Waterblocks
|
|
|
|
|
|
|
|
 |
|
|
The Cascade is the only block tested with a single inlet and outlet design, and its approach to impingement cooling is also quite a bit different
than the RBX and Whitewater. It is also noteworthy that the Cascade was designed in an open source manner on our own Pro/Forums. Cathar's comments on the design goals and process for the Cascade are as
follows:
|
|
|
|
"My design philosophy for waterblocks has evolved over time to be one
of "How can we get all of the water molecules entering a block to interact with the metal as close as possible to the source of heat?"
After
the White Water design, I was looking for a way to more effectively utilize the jet impingement effect of the White Water. Jet impingement has long been acknowledged as the most effective way of transferring heat from a
material into a liquid, with it being used to control nuclear reactions in fission reactors. I began researching jet impingement arrays, looking at both research papers and the experimental works of forum individuals like
Jaydee116 and Volenti. The issue seemed to me to be more of a problem of flow management with the outwash of jets interfering with adjacent jets. After washing some dishes and sticking the faucet inside a cup and watching the
water swirl, and the beginnings of an idea in a post by BigBen2K, I embarked on getting a design working whereby small tubes would project into an array of cups and thereby eliminate interference of the jets.
The
jet-in-a-cup effect creates a double-impingement action of cooling the very base of the cups that are directly above the CPU. The water then slams into the base of the walls of the cups cooling any heat that conducts up the cup
walls. Almost all of the CPU's heat gets dissipated within 2-3mm from the CPU itself, this living up to the initial stated design philosophy. When the water exits the cups it flows away without affecting any other jet's
activity. Much experimentation was required to find the correct balance of jet width and height, cup width and height, inter-cup geometry, and then find a way to get the whole lot affordably machined.
The Cascade
waterblock is the result of about 6 months of research and development. It can be scaled up in size, and a number of prototypes already exist for cooling larger heat source areas, such as TEC's."
-Cathar (Stew Forster) of Little River Waterblocks
|
|
I am using the following test equipment to gauge waterblock performance:
Digitec 5810 with YSI dual linear thermistors for water temperatures both in and out of the waterblock and for room air temperature. Hoses were insulated
with foam to improve deltaT measurements across the waterblock, and the YSI probes were also insulated with neoprene.
- Maxim MAX6655 diode evaluation system with leads soldered directly to the internal diode pins of a 1700+
TBredB. Diode readings were calibrated in a water bath. MAX6655 readings were collected by a notebook computer rather than by the test system.
- GPI digital flowmeter.
This unit has 0.01GPM resolution, less than 1% error and is calibrated for the 0.5-1.5GPM flow range.
- Hydrothruster 500GPH pump, 1970 Chevy Blazer heatercore, 2x 120mm Papst fans (105CFM), and tons of ½" clearflex,
silicone, a needle valve to adjust flow rates, a 20% antifreeze/80% distilled water coolant, and hose clamps.
- Test system was a TBredB 1700+ JIUHB running on an Epox 8K3A motherboard. The 8K3A had to be modified to no
longer read from the CPU's diode so that the MAX6655 would work properly. This was done by breaking pins S7 and U7 inside the ZIF socket. The system was placed under load by using CPUBurn at high priority.
- "BillA" formulation thermal paste from Arctic Silver. This paste is designed to have as little settling time
as possible.
A note should be made about mounting. To even the playing field, all the tested waterblocks were installed using the same mounting hardware (from Cathar's
Cascade). The springs of the LR Cascade provide the recommended mounting pressure for AMD systems when they are tightened five complete turns from first contact of the wingnut to spring. There is a fair amount of
variability in such a mounting process and so 10-15 replicates were done for each waterblock.
|
|
|
|
|
|
|
Test Methods
|
|
I could spend months testing a single waterblock without ever getting to the point where I felt 100% satisfied and "done". On the other hand, there are
constantly new waterblocks being developed and sent for testing and I have a life and other hobbies that I would like time for as well. The compromise I have developed is to test as follows:
Each waterblock is mounted 10-15 times with obviously "bad" mounts thrown out to obtain 10 replicates.
Each mounting is done at 1.5GPM flow rate, and performance is measured after 60 minutes of 100% CPU load. Water inlet, outlet, room temperature, and CPU diode temperature are all collected every 10 seconds for a 1 minute period and averaged. An average performance and standard deviation are then calculated.
- After the above tests provide average performance, a flow test will be conducted with the following flow rates being
tested: 0.5, 0.75, 1.00, 1.25, 1.50, 1.75, 2.0, 2.25, and 2.5 GPM.
- Performance of the flow test is adjusted to the average value and error bars are included that refer to one standard
deviation from the average.
This approach isn't as robust as running the flow tests 10-15 times, but it is far less time intensive. Preliminary testing showed that there was good
agreement between running multiple flow rate tests and adjusting a single test to the average at 1.5GPM.
|
|
|
|
Testing Results
 |
|
|
|
|
| Random Forum Pic |
 |
| From Thread: Question about milling a waterblock |
|
| | ProCooling Poll: |
| So why the hell not? |
|
I agree!
|
 67% 67%
|
|
What?
|
 17% 17%
|
|
Hell NO!
|
 0% 0%
|
|
Worst Poll Ever.
|
 17% 17%
|
Total Votes:18Please Login to Vote!
|
|