|
|
|
|
 Cooltechnica AquaExtreme XG Case Review Cooltechnica AquaExtreme XG Case Review
|
|
Date Posted: Jul 22 2002
|
|
Author: pHaestus
|
|
|
|
|
Posting Type: Review
|
|
Category: Case Reviews
|
|
Page: 3 of 3
|
Article Rank: from 1 Readers
Must Log In to Rank This Article from 1 Readers
Must Log In to Rank This Article
|
|
|
|
|
Note: This is a legacy article, imported from old code. Due to this some items on the page may not function as expected. Links, Colors, and some images may not be set correctly.
|
|
|
Cooltechnica AquaExtreme XG Case Review By: pHaestus
|
|
 |
|
|
|
Filling and Bleeding: The cooling loop is an inline system with a T that leads to a fill/bleed line.
Since the pump is wired to a relay, you have to either move the relay's live connection from NC to NO, or else you can just use a wire to jumpstart your PSU (green wire on atx connector goes to ground on atx connector). I went with this route because I could use the PSU's switch to control the relay this way. To fill the system, a funnel is placed into the top of the fill line and then coolant is slowly added. Once enough liquid is added to prime the pump, I then turned the pump on and poured liquid in via the funnel to keep the lines filled so the pump didn't run dry. Once the water level was near the top of the fill tube, I plugged the fill line and turned the case on all sides (moving the fill line around so it was always the highest point) and shook it to remove as much trapped air as possible. Finally, I booted the system and let it crunch CPU Burn for a day and periodically tapped out all the air bubbles at the "T". After a day, I didn't notice any further air bubbles in the lines over time.
|
|
|
|
System Installation: The AMS G Tower doesn't feature a removable motherboard tray, but it is roomy and the HDD cage does come out after removing a few thumbscrews.
With the HDD cage removed there is ample room for installation of motherboard. I encountered an issue with the G Tower's motherboard installation method, however. The G Tower uses normal brass standoffs for motherboard mounting on all except the bottom three holes. For these holes, plastic pronged standoffs are used that snap into place through the motherboard. When I installed my motherboard for the first time, I thought this was a great idea, as it held the board in place and made tightening down all the remaining screws a snap. When I realized I had forgotten to install the Swiftech Socket A standoffs and had to pull the motherboard is when I ran into problems. It is a bit of a pain to get the board back out, particularly if you don't have/can't find your needle nose pliers. Eventually I got the mobo out, but it was an annoyance. Other than that, the system went together reasonably easily. The front panel of the case is held on with 6 large screws on the front of the case, and once you pull it off you can pop out the bay covers for cd-rom drives or floppy (if you still use those archaic things).
The modifications done by Cooltechnica to add a dual fan PSU worked reasonably well: I put a 350W Enermax into this system without much incident. I had to
pull two of the fan grill screws off to get it to fit, and then apply a little force. Once it popped into place it was fine and I just put the screws back in.
|
|
 |
|
You can see that the plate that separates the PSU area from the bottom part of the case still partially blocks the 92mm fan, but I figured it was not a big
issue. I really need to get another Sparkle 400W anyway.
The Swiftech block was really a joy to mount. I have spent too many evenings trying to contort my fingers to tighten down nuts on bolts that have
practically no clearance from the hoses on the block.
|
|
|
|
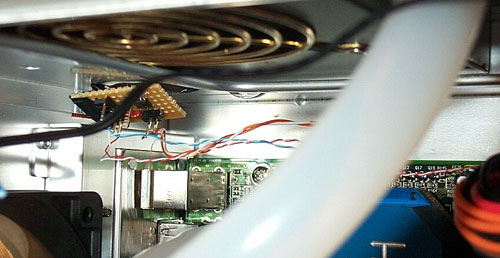
Temperature Monitoring: With the included Digidoc5, there are 8 sensors that are available for temperature readings. I figured that you might be interested in how I arranged the sensors, since it will give you some ideas for your case. The goal is to take measurements in locations that will give you some insight into the overall cooling of your case. This will give you a heads-up if something goes wrong, and can help you tweak the system to improve performance. I placed one thermistor in the lower front of the case where it could measure the temperature of the case's intake air. I placed the second probe in front of the 120mm exhaust fan (I used an Enermax clear bladed fan). The third probe I routed down the fill line of the water loop after coating it with some Plumber's Goop. A flat probe was used, and it was placed right in the T so that the temperature of the water heading into the waterblock inlet was monitored. To seal the fill tube, I used a cork and some parafilm. This was a temporary solution; an inline probe or two would be much preferred for long term usage. The temperature of air underneath the radiator (intake air) was also monitored with a probe, and another was placed down near the HDD to monitor air temperature in that region of the case. Finally, I also taped a thermistor on the backside of my video card's GPU. Two of the probes reported temperatures that were about 2C higher than the others, so those weren't used. I recommend that one calibrates their thermistors with the following procedure and makes notes of how much each probe is offset.
These positions for temp reading were chosen because they can give me an overall view of how air and heat is moving through the system. Of particular
importance are the water temperature and the radiator intake air temperature.
Comparing the Delta T from the air to water is a good measure of radiator performance. Similarly, comparison of the water temperature to CPU diode temperature can give you a good way to evaluate waterblock performance.
|
|
|
|
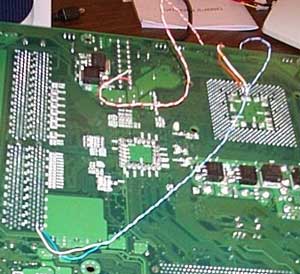
You will notice that I didn't directly affix a probe on the CPU or HDD. Speedfan handles HDD temperatures by monitoring S.M.A.R.T. information. The IBM 75GXP I placed in this computer correctly works with Speedfan, so I could get drive temperatures like that. Similarly, CPU diode temperatures were collected from a MAX6657 SMBus reader that was soldered onto my Epox 8K7A+ motherboard:
The diode reader was checked with a Duron 1.2GHz CPU that has an undercore temp probe epoxied in place, and temperatures were as expected (the
solder points and wire lengths are all proper for reliable temperature monitoring).
|
|
|
|
|
|
If I were testing only the radiator or waterblock, I would conduct more exhaustive flow tests, pressure drop tests, use several fans, and use better temperature
monitoring gear. Since this is a complete package that is sold by Cooltechnica, I opted to instead test real world performance. The reader should be aware that "real world" often equates with "sloppy" and
"incomplete". However, none of my more serious equipment would fit inside the G Tower, and even if it did, it would substantially affect flow rates and cooling performance.
So my approach was to assemble the cooling system exactly as recommended by Cool Technica and to be as careful as possible with the monitoring equipment that end users would typically use: the DD5, SpeedFan, and an Athlon XP internal diode reader.
|
|
|
Temperatures: Tests were conducted with the 120mm blowhole fan at 12V and at 7V. The CPU used was an Athlon XP 1600+ @ 1575MHz and 1.8V (damn 8K7A+ won't give me the correct default voltage). Initially, the system was forced into a full idle with WPCredit (register 62 to "B7"), and once air, water, and CPU temperatures were stable then the system was put under load with CPU Burn (K7Burn) set to high priority. Temperatures were collected every minute until they began changing slowly, and then every two minutes. After the load temperature was stabilized, I turned off CPU Burn and let the system return to idle. The testing was repeated 3 times at 12V to get an idea of variability and to make sure that the waterblock/CPU contact was good for the final run, and then after the system was tested at 12V the fan was lowered to 7V and the test was repeated.
|
 |
|
|
|
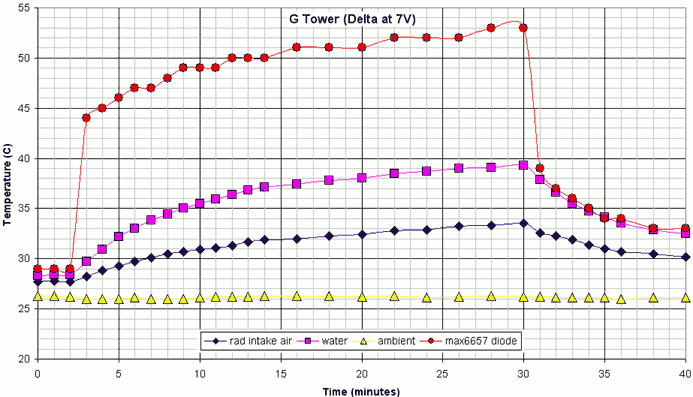
First, let's look at the results with the fan at 12V. One can see that the air underneath the radiator (radiator intake air) warms up significantly as the
system is generating heat.
Since this is the air that cools the radiator, then the water also continues to rise. There are a couple of reasons that this could occur. The radiator is next to the PSU intake vents, and right below it is the northbridge, RAM, and other heat-producing components. It is possible that these combine to increase the air temp in the top half of the case when the system is under load. The other option would be that the 120mm fan used (an 86 cfm Delta) isn't powerful enough and heat is radiating from the radiator inside the case. My guess is that a combination of the two factors is occurring. The top blowhole may not have ample access to fresh air, and then there are other components in the vicinity that also generate heat.
After approximately 15 minutes, the cooling system seems stable, as there is no increase in CPU, water, or radiator intake air temperature. This means, at
least for this setup, that at least a 15 minute run is required to reach any sort of steady state. Many of you will be surprised at the 50C CPU temperature, as it is much higher than typically reported by most
overclockers for watercooled CPUs.
For reference, the Swiftech MCX-462 heatsink with 68CFM Delta fan at 12V reports a load temperature of 61C (air 1" above fan was 29C) with the 120mm exhaust fan at 12V and the top blowhole fan removed. Another potentially relevant number would be the temperature reported by the Epox in-socket thermistor: 41-42C under load. I will refrain from commenting upon the quality of this number, but perhaps it will avoid some e-mails regarding high temperatures. Speaking of which, let's take a look at the 7V Delta numbers now.
|
|
 |
|
|
|
|
|
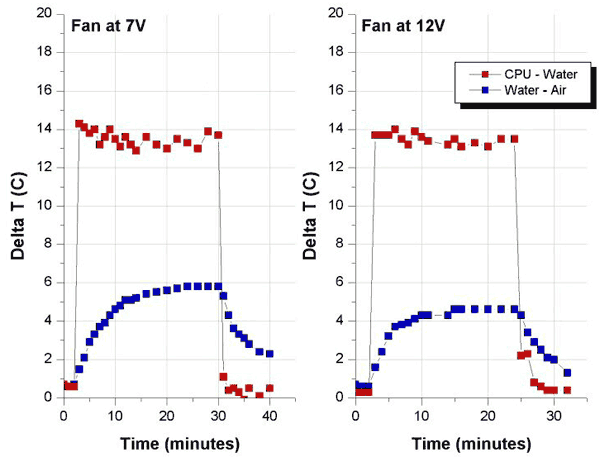
With the fan at 7V, some important differences in performance are observed. First of all, the temperatures continue to creep up even after 30
minutes.
I believe that the vast majority of temperature rise is still described by this test though. The reason for the temp increase is clear: the radiator's intake air continues to rise when the system is under load, and gets as high as 34C. Water temperatures reach 40C at this intake air temperature, which is a bit warm for my tastes. You can see that the room temperature remained fairly constant (26C) throughout testing. My guess would be that the 86CFM fan at 7V is simply not enough airflow for the BI Pro. Considering that HW Labs recommends 100CFM for optimal performance, this isn't too surprising. My recommendation would therefore be to skip the 7V relay for the Delta 1212H, and run it at 12V. If you want variable fan speeds, then pick up a more powerful fan, such as the Mechatronics from KD Computers or a higher CFM Delta from Cool Technica. By choosing a 38mm thick 120mm fan, you
may be able to generate a higher static pressure and get improved performance for the same noise levels. And more to the point, both of these fans are loud enough that you will get a good bit of use out of the 7V relay.
Since there are a few useful measurements available from the above testing, some actual analysis might be in order. It is possible to calculate Delta Ts
(differences in temperature) that give a clearer idea of the performance of different components of the system than looking at the raw temperatures only.
|
|
 |
|
|
|
Let's look first at the Delta T for CPU minus water.
This is a measure primarily of the waterblock's performance. A good waterblock will have a smaller deltaT between the water and the CPU, because the block will more effectively transfer heat to the water from the core, so the baseplate of the block (and thus the CPU) will be at a lower temperature. You can see that at both 12V and 7V, the DeltaT for the waterblock rises very quickly from idle to a constant 13.5-14C deltaT. This is in contrast with the raw numbers, where the 7V setup takes a very long time to come to a constant temperature. The reason for this can be explained by the deltaT between the radiator's intake air and the water. This relationship continues to slowly increase over time before eventually reaching a plateau. This takes quite a long time (nearly 30 minutes) at 7V. You can also clearly see from these numbers that any performance issues encountered with the system lie with airflow through the BI Pro. The actual performance of the radiator itself is not bad: a 4-6C rise over the intake air temperature depending upon 7V or 12V operation of the fan. That is actually very good for such a small radiator! However, the fact that intake air temperatures continue to rise tells me that this cooling setup could use some tweaking to improve the airflow through the case to the radiator and to increase CFM through the BI Pro. This was why I mentioned possibly using more powerful fans earlier. One could also try and improve performance of the fan that is present by building a shroud to allow the fan to work at higher efficiency. Another possibility would be to try and improve the airflow through the case to get cooler air in the radiator intake area. One could also add a second fan to the BI Pro in a push/pull configuration. This may or may not do much good if both fans are undervolted.
|
|
|
Noise: I am very sensitive to high pitched fan noise, but the sound of 120mm fans doesn't bother me too much unless they are very loud. I found the Delta at 12V to be acceptable while I was working on computer and listening to mp3s, but when I wanted to watch a movie then I turned the fan down to 7V. I actually found the 92mm fan in this PSU to be an annoyance; when I next break the system down that thing is definitely going to be turned off. The included Delta 80mm intake fan is noisy; so noisy that I unplugged it after listening to it for about 15 minutes. With Speedfan, I saw my HDD temps climb from 30C to 33C when I disabled the fan. To me, that was well worth the difference in noise. I don't think that the AquaXtreme is a silent solution, but there are some bright spots about this case compared to my Lian Li. Since the Lian Li has intake fans that are close to the ears if the case is on a desk, then the noise of the fans is very noticeable on those cases. This is compounded by the fact that Lian Li bezels are thinner than the AMS, and that they can sometimes rattle a bit. With only a quiet 120mm exhaust back away from your ears, the G Tower is a reasonably quiet case. The top blowhole at 12V is going to be noticeable, but I at least didn't find it to be of an annoying pitch.
I noticed no vibrational noise from the Eheim; the Velcro apparently is enough padding to stop it from rattling in the case. As soon as air is bled from
the system then the pump is inaudible.
|
|
|
|
Overall, I found the Cooltechnica AquaXtreme XG to be a pleasure to set up and use. The case looks great, there is no need to use power tools to add water
cooling, and it has been reliably running my overclocked XP at a speed higher than was possible with my (much noisier) Swiftech heatsink.
I especially liked the fact that the AquaXtreme XG was basically a kit that allowed me to pick and choose parts at one store and get everything sent in a single package. Then, I could assemble the system myself, without having to find the time on a weekend to cut blowholes and such. I enjoy doing my own casemods, but I seem to only find time for computer stuff late at night nowadays and my neighbors don't care much for the holesaw. The "factory" modifications were clean and professional in appearance, and there was no metal dust or debris inside the case. You would think that was a given, but too often it isn't. Even with the blowhole and pump plug factory installed, I still thought that enough work was required (wiring the relay, mounting the pump, running the tubing, filling and bleeding the system) that I felt as though I had accomplished something when I was done setting up the cooling system.
There were several options that were included in my case that aren't "musts" but certainly made the total package nicer.
The Swiftech Pump Relay System worked perfectly and was simple to install. If you decide not to buy the relay, Cooltechnica still provides a plug outlet on the rear of the case for a pump. The Digidoc5 is a piece of equipment that is definitely handy to have around for overclockers. The accuracy isn't good enough for serious testing (you could calibrate it to improve this somewhat), but as you can see from the review you can certainly use its sensors to extract some useful information about the performance of your cooling system. The custom 7/12V relay that was included is very cool, and definitely a bargain at only $10 over the price of a standard DD5 as an addon to the XG or XGL kit from Cooltechnica. Since it is a 10A unit, one can get by with wiring all the system's fans to the relay with no worries (the fans are actually receiving their voltage from the PSU's Molex connector and not through the DD5 so there shouldn't be any danger of shorting out fan headers on the digidoc). If you get a DD5, then definitely add the relay.
There were some complaints that I had about the G Tower case and the AquaXtreme cooling system. Starting with the case, the major gripe I had was with the
three plastic standoffs for the motherboard. I really got pissed getting that mobo out!
The other complaint was that the multimedia ports were pretty much useless to me since I don't have a motherboard that includes the headers. I was told by Bruce at Cooltechnica that AMS has instructions for using the ports with an Audigy sound card. Unfortunately, I use a Philips Acoustic Edge and so it looks like I will have to make my own cables. Not impossible by any means, but the end user shouldn't have to modify the case just to use its features.
Moving to the cooling system, I had three improvements that I would suggest be changed in a later revision of the AquaXtreme XG. I think that a more
powerful top blowhole fan (100 CFM at least and preferably a 38mm) should be used for the radiator.
If not, then I would NOT suggest using the 7V/12V relay on the radiator fan because the Delta at 7V isn't producing enough airflow to cool the water. My second suggestion would be for the case to be equipped with a 120mm exhaust fan and top blowhole fan rather than with a blowhole and 80mm intake. The intake fan isn't really accomplishing much other than slight HDD cooling and lots of noise (in fact, even Cooltechnica suggests using the DD5 to set the 80mm fan to "off"), but the 120mm exhaust is really critical to overall case cooling. My final suggestion for improvement is that I think that inline temperature probes should be an option when the Digidoc5 option is added. It isn't hard to make your own with a "T" or "Y" connector, but since the DD5 is being pushed as an option for the kit I would have like to been able to just pick up some prebuilt and pretested probes. These are not serious issues.
|
|
|
|
The Bottom Line: Cooltechnica's AquaXtreme XG barebones kit combines two of the most popular aspects of case modding: an attractive aluminum case and the chance to tinker with assembly of a
water cooling system. If getting your hands dirty isn't your thing, then CoolTechnica also sells the same system completely preinstalled and filled as the AquaXtreme XGL. The parts (waterblock, radiator, fans, case)
were all high quality, and with the fan at 12V performance was quite good. Modifications were very cleanly and unobtrusively done, and the case is an excellent way to get into water cooling and aluminum cases at the same
time. Even if liquid cooling isn't your thing, you might still want to give the AMS G Tower consideration if you need a roomy (and pimp) midtower.
Thanks to Bruce at Cooltechnica for providing this system for review.
|
|
|
|
| Random Forum Pic |
 |
| From Thread: Post your watercooled pictures |
|
| | ProCooling Poll: |
| So why the hell not? |
|
I agree!
|
 67% 67%
|
|
What?
|
 17% 17%
|
|
Hell NO!
|
 0% 0%
|
|
Worst Poll Ever.
|
 17% 17%
|
Total Votes:18Please Login to Vote!
|
|