|
|
|
|
 Cooltechnica AquaExtreme XG Case Review Cooltechnica AquaExtreme XG Case Review
|
|
Date Posted: Jul 22 2002
|
|
Author: pHaestus
|
|
|
|
|
Posting Type: Review
|
|
Category: Case Reviews
|
|
Page: 2 of 3
|
Article Rank: from 1 Readers
Must Log In to Rank This Article from 1 Readers
Must Log In to Rank This Article
|
|
|
|
|
Note: This is a legacy article, imported from old code. Due to this some items on the page may not function as expected. Links, Colors, and some images may not be set correctly.
|
|
|
Cooltechnica AquaExtreme XG Case Review By: pHaestus
|
|
|
The Cooling system and Accessories: (Cont.)
|
|
|
|
|
|
|
|
|
|
|
|
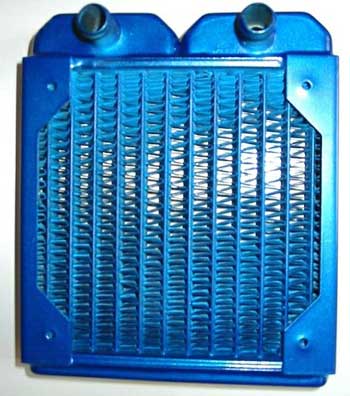
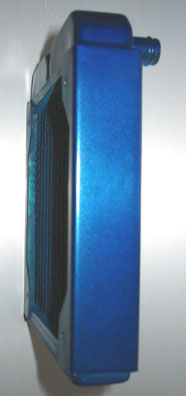
Black Ice Pro radiator: I have always used heatercores in my cooling systems, and so I was eager to take a look at the Black Ice radiator from HW Labs. The Pro is a substantial revision to the original Black Ice, remaining basically the same size: 6"x5"x1" (slightly larger than a 120mm fan), and still featuring an integrated plenum for fan attachment, but now featuring two pass rather than 4 pass construction, ½" hose barbs. These changes in design should make the BI Pro considerably less resistant to flow than the original Black Ice radiator (now dubbed the Prime). Another design change made by HWLabs was reducing the density of fins to allow better airflow through the radiator. This is both good and bad, as on one hand quieter fans may be used but on the other the surface area (and maximum potential cooling) is somewhat reduced. The BI Pro is available in three colors: black, coolmetal (blue), and Firebrand (red). The AquaXtreme I am reviewing featured a Coolmetal radiator.
|
|
|
 |
|
 |
|
|
|
With such a compact radiator, airflow through the fins is critical to performance. Cooltechnica ships the AquaXtreme with a Delta WFB1212H fan. It is a 120 x 25mm fan rated at 86.5CFM and 37.6 dBA. One typically thinks モhair dryer" when Delta fans are mentioned, but the WFB1212H is actually
similar to the Panaflo M1A in most respects.
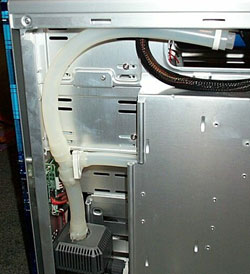
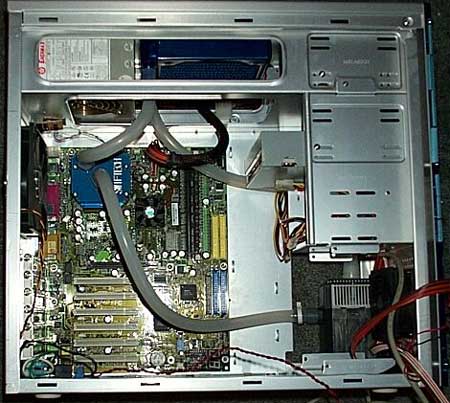
When using the Swiftech block, it is necessary to mount the BI Pro in a top blowhole to fit the block and rad for some motherboards.
My preference would be to mount the radiator on the 120mm exhaust fan actually, but the BI Pro was out of the way and fit well on the top blowhole:
|
|
|
 |
|
 |
|
|
|
|
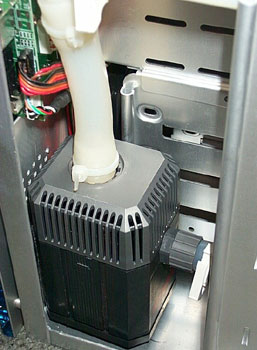
Eheim 1048 pump: Eheim pumps are known for being quiet and reliable, and are very popular with watercoolers. The 1048 is 168GPH with no flow restriction, has a max head of 5ft. It has a heat output of 10W, and comes with ½" barbs on both inlet and outlet. Cooltechnica placed the Eheim in a rather unique position.
|
|
The pump is on its side on the backside of the case next to the 3.5" drive bays.
The pump is held in place with Velcro tape, and the inlet is vertical. Directly above the inlet is the "T" connector with fill line, so filling the loop with a funnel through the fill line works very well.
|
|
|
 |
|
|
|
|
|
|
Fittings, hose, and clamps: Cooltechnica uses ½" barbs throughout their setup, and 3/8" silicone tubing through the cooling loop. 3/8" ID hose fits very snugly over ½" barbs, and this is actually a good compromise. If ½" thick wall silicone is used, then the tubing becomes bulky and harder to route, but if 3/8" barbs.are used with 3/8" tubing then the flow resistance is increased a good bit (3/8" barbs have an ID of roughly ¼" while ½" barbs have an ID of roughly 3/8"). For clamping hoses to the barbs, Cooltechnica includes adjustable plastic hose clamps. I typically use the metal screw-down type clamps, but these seemed to do the job well enough. I have heard people report that these aren't a good idea for water cooled computers because they will leak. I can tell you that we use these plastic clamps in our chemistry lab to connect tubing to barbs for a circulating water bath. That system runs 24/7, temperatures change from 15C to 40C (depending upon experiment), and I have never seen a drop leak from them in the five years I was in the lab. Your mileage may vary, I guess. Besides the hose and clamps, two ½" barb x ½" NPT plastic fittings for the Swiftech block, a ½" "T" fitting, and a 3/8" NPT cap for the fill line were also included. Another nice touch was including a small funnel for filling the system. I have made ghetto funnels from coke bottles a time or two, and the one Cooltechnica includes works much better Cooltechnica also ships their setups with 4oz of Reline water wetter, which incidentally is the perfect amount to add to a 1 gallon of distilled water. (not included)
|
|
|
|
|
|
|
|
|
|
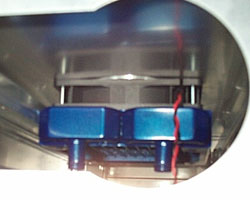
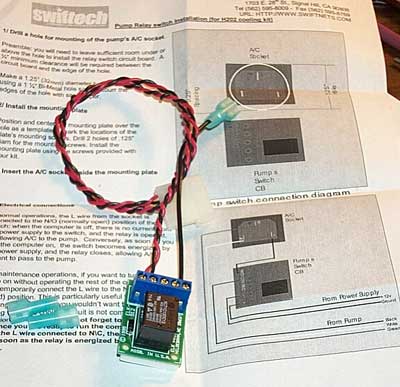
Pump Relay System: The review model included the optional pump relay system from Swiftech.
|
|
 |
|
|
I had a Eheim 1048 of my own and so I wired mine up myself. The directions from Swiftech were clear and detailed, with a couple of figures to illustrate
the wiring.
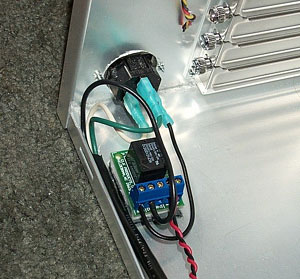
Once the pump's plug is cut, everything connects with insulated crimp on spade connectors, so no soldering is required. I went ahead and tinned the wire ends anyway though. Here is how the relay looked installed in the bottom of the case:
|
|
 |
|
|
Swiftech's relay is set up so that you can wire the pump as either NO (normally open) or NC (normally closed).
By changing the live wire from the plug to the relay, you can run the pump without the computer turned on for filling and bleeding. It would be a bit more elegant in my opinion to just add a SPST rocker switch so that you can switch in between. You have to be careful though because the chances of turning on the system without the pump running are then greater.
|
|
|
Customized Digidoc5: The setup sent for review included a DigiDoc5 made by Macpower. For more information and a detailed review of the DigiDoc5, check out Joe's review. The only differences in the
DD5 sent by Cooltechnica and the one reviewed by Joe were the color (this unit is a silver that matches aluminum cases well) and an interesting electrical modification that was added to the DD5.
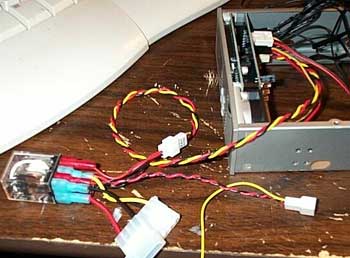
I think that the modification demands some discussion, as it adds a lot of functionality to the unit. A 10A 12VDC relay was sent along with the DD5 and was wired up so that when the relay is "off" then the fans get 7V, and when the relay is "on" then the fans receive the full 12VDC from the power supply.
|
|
 |
|
|
The wiring is straightforward: the 12VDC and ground that switch the relay are on a 3 pin connector that plugs into the DD5 fan header.
The relay also requires 12V and 5V from the PSU. Fans can be plugged into either a 4pin molex, a 3pin Molex with passthrough rpm monitoring wire, or both. You can drive many fans with 10A! I personally connected the 120mm Delta blowhole fan and the 120mm Enermax rear exhaust to this relay, and I then plugged the thermistor I was using to measure water temperatures into the same location. That way, the 120mm fans automatically switch from 7V to 12V when water temp gets above a threshold (I set mine to 35C) and this will hopefully get the liquid temps back down. One observation I made was that if the set temperature was close to the final equilibrium temperature then the DD5 would just constantly cycle the relay on and off. This is annoying. You can avoid that by setting the temperature low enough that this doesn't happen. The thermal control can also be overridden with the "force" button on the DD5 faceplate. If you are like me you will end up pressing this and fiddling with it ALL the time. I highly recommend this fan relay for people who are considering a DD5, as it greatly improves the functionality of the unit.
|
|
|
|
|
|
|
Cooling installation: The case arrived with the Black Ice Pro already mounted to the top blowhole fan, and with a plug in the lower rear of case for the pump. To prep the pump, I added a little Plumber's Goop to the threads of the intake and outlet fittings and then tightened them down. Eheims usually don't leak, but I am a Plumber's Goop fiend. To install the cooling loop, I had to put the Eheim 1048 in its proper place near the 3.5" bays by using supplied Velcro tape. Then, I measured the proper length for my pump cord and cut of the plug. I then pulled away enough of the plastic insulation on the cord to move the wires around to the plug and to the relay. Then it was a simple matter of using some needle nose pliars to crimp the spade connectors to the pump wires (ground and neutral) and putting those on the plug. The live wire of the pump goes to the relay, as does a live wire that runs from the plug to the relay. Once the pump is in place, the next step is to start running the tubing.
I routed all the tubing and ordered the loop as suggested by Cooltechnica, with a T for a fill line just before the intake of the pump and with the components
arranged in a loop as follows: pump waterblock radiator pump.
|
|
 |
|
|
Filling and Bleeding
 |
|
|
|
| Random Forum Pic |
 |
| From Thread: Post your watercooled pictures |
|
| | ProCooling Poll: |
| So why the hell not? |
|
I agree!
|
 67% 67%
|
|
What?
|
 17% 17%
|
|
Hell NO!
|
 0% 0%
|
|
Worst Poll Ever.
|
 17% 17%
|
Total Votes:18Please Login to Vote!
|
|