|
The polishing compound I used.
Before we get started, I have compiled a list of supplies you need, or suggestions/hardware I used during the process: *note: I use Rust-O-Leum Paints for they are priced well and are of excellent quality. I also hear Krylon is good.)
- 2-3 cans of Automobile Primer. *This is the best stuff! It is dry and ready to wet-sand in 30 minutes! This should cover the whole case and all panels on a Mid-Tower. I have a rather large midtower case, the Addtronics 6896a, and 2.5 cans were sufficient, including all the times I screwed up.
- Gloss Enamel Paint for color
- Gloss Clear Coat This stuff is awkward, I'll talk about it later in the article.
- 600, 1500, 2000 Grit Sandpaper *WET* The best to get is 3M Imperial Wet/dry sandpaper. It's also nice to have 220 grit handy to get out some deep scratches etc.
- Spray Grip, This is optional, I don't use it, too much of a hassle and lots of pressure is required to get any paint out of the can.
- Rubbing Compound One of the most important items on this list
First off, big thanks to Jeff Neima over at http://www.neima.com The 14 steps below are based off Jeff's original 19. Basically the same. Check out his site, he has a sweet Enlight mod! Anyway let's get painting.
Here are the basic guidelines of getting a good finish on your computer: *credits to Jeff Neima
Step 1: Sand 600 grit.
Step 2: Prime.
Step 3: Sand 600 grit.
Step 4: IF sanding went through the primer, then go back to Step 2.
Step 5: Color Coat.
Step 6: Sand 600 grit.
Step 7: IF sanding went through, then go back to Step 5, or maybe Step 2 if you have to.
Step 8: Sand 1500 grit.
Step 9: Clear Coat.
Step 10: Sand 600 grit.
Step 11: Sand 1500 grit.
Step 12: IF sanding went through, then go back to Step 9, or maybe Step 2 if you have to.
Step 13: Sand 2000 grit.
Step 14: Apply Rubout coats depending on your type of compound. *see below.
Those are the basic guidelines to all pieces of your case, whether it's plastic or metal.
Things To Do Before Painting
You should be wearing proper painting attire, i.e. old shoes, shorts and shirt.
Work in a well-ventilated area. I can't stress this enough. THE FUMES WILL GET TO YOU! ;o)
Cover near by objects. The over-spray will travel farther than you think.
Rinse the objects you wish to paint, and dry them thoroughly. *note, more info further down* Make sure you wipe off ALL LINT, otherwise, you will just paint it to your surface, and leave a mark after you sand it out.
Wear a protective mask. I use a wash cloth over my mouth and nose. Trust me, the headaches you get from not wearing it, are not worth it. You will learn to hate the smell of paint, guaranteed.
That pretty much covers what you should do before you start painting.
Applying Your First Coat
The primer should be a relatively thin layer of paint. It does not have to be perfectly smooth, so go briskly over the surface, don't go slowly like you would with the color and clear coat. If you use too much primer, it becomes gummy and UN-paintable. ALWAYS SPRAY AWAY FROM YOUR BODY. This forces and pushes the over-spray past the surface. If you spray front to back, and then back to front, or side to side, the paint dust will settle on your surface and leave the finish rough and even sometimes mildly coarse. Also, paint the sides of your object first, for the same reasons. The Automobile Primer is great because it is ready to wet-sand in only 30 minutes.
Sanding
This is one of the most time consuming and boring parts of the painting process. It requires lots of patience and provides plenty of trauma to the lower back ;o). I have heard people who sand in the shower, which works wonders on small parts like drive bay covers and front bezels, but big door panels are just too big to fit in my shower. I suggest you use saw horses if you have them. Just stack them up close together, and lay your panel or what have you on there, and start sanding away. It's best to do this outside for obvious reasons, and near a drainage system and a garden hose.
When you are sanding, make sure it is as flat as possible. You don't want any roughness. You can tell if you did not sand properly if you can see dark spots or an "orange peel" like texture. Spend the most time with the high grit paper until it is as smooth as glass. Water should sheet right off it and leave a mirror finish.
Drying –VERY IMPORTANT!!!!!!
I can't stress this enough. After you wet-sand your pieces make sure they are totally dry. One single spot of wetness can ruin your day, or whole week in my case. When you go to spray and the surface is moist, it will sort of bubble up. This bubbly surface is extremely noticeable and VERY hard to sand all the way out. What I do, is if it's hot outside and very sunny, I lay my panels out on my driveway where it is very warm. The metal panels dry extremely fast. You will save lots of time this way. This is one of the most important parts of the painting process, so keep it in mind.
This does not apply to wet paint. Leave your freshly painted pieces away from debris and extreme cold or heat.
Color Coats
The High-Gloss enamel should be sprayed on in a similar fashion as the primer, but much slower and more precise. Take long slow strokes starting from the area closest to you, to the top. Overlap each stripe of paint a little bit to ensure the whole surface is covered. The paint should not look rough, but really really slick and full. Wavy lines may appear from excess much paint, but that's ok. As long as it is slick and relatively flat, it will easily sand out and become even with the rest of the surface.
Sometimes, if you are too close to the surface while you are painting, you will have bubbles form on the surface which is not a good thing, dry painting over them to burst them, or get a tissue and dip a corner over the bubble to absorb or pop it.
A lot of the time, when you are painting, the can will sputter and spray blobs of paint all over your surface. Have a paper towel or Kleenex ready, and dip a corner of your tissue into the spot. It will absorb most of the paint and leave your surface sandable. It may not look like much at the time, but when you try to sand out those dots, you'll be there for a while, not to mention another day lost of painting, drying and
Let it dry for AT LEAST 24 hours before you do anything. I am very impatient, and sometimes go at it with the sandpaper before 24 hours are up. Sometimes, if you have a real thick coat, it won't dry for up to 3 days. So keep that in mind. Try pushing down with your index finger some where on the surface that won't be visible. If it leaves a finger print, then let it dry for another day.
Clear Coats
The Clear gloss I bought was extremely awkward. I read the back of the label to look over the instructions, and it read that it is dry to touch in 30 minutes and to handle in 1 hour. I have found out the hard way, that you should let it dry for 24 hours just like the color coat. Otherwise when you handle it, your finger prints will be permanently stuck on the surface. This is the worst thing possible, as you have to basically sand down through 3 layers and start all over……BE PATIENT.
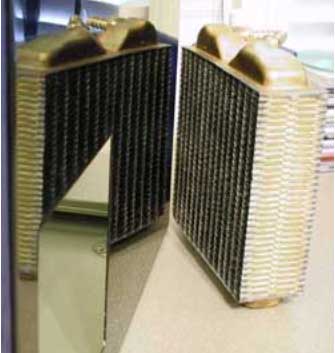
Rub Out
This is the final step that brings out the mirror shine. After you have sanded with the 2000 grit paper, your surface should something like this:
|


 How to paint and then ploish your case to a mirror shine