|
|
|
|
 pH's guide to wiring up pumps in your H2O rig pH's guide to wiring up pumps in your H2O rig
|
|
Date Posted: May 3 2002
|
|
Author: pHaestus
|
|
|
|
|
Posting Type: Article
|
|
Category: Electronics
|
|
Page: 1 of 2
|
|
Article Rank:No Rank Yet
Must Log In to Rank This Article
|
|
|
|
|
Note: This is a legacy article, imported from old code. Due to this some items on the page may not function as expected. Links, Colors, and some images may not be set correctly.
|
|
|
pH's guide to wiring up pumps in your H2O rig By: pHaestus
|
|
pH's Guide to Wiring Pumps
|
|
5/3/02 - By: pHaestus
|
|
|
|
|
|
|
|
|
|
If you are a regular in any of the popular overclocking and cooling forums, then you have probably seen countless threads posted by people with new water cooling systems looking for help in wiring their pumps inside their cases. There are several different ways to go about doing this and countless options and add-ons that people do when setting up their pumps. If you look hard enough through the forums, you will most likely be able to dig up someone's posts and decipher his instructions. I thought that it might be easier for everyone to have all the information in one place in a format that is easy to use as a reference.
|
|
|
|
We are dealing with 110VAC in this article. If you are careless, it will hurt you badly. I am providing the following information for instructional purposes only and presenting methods that have worked for us in the past. In no way is the author or ProCooling.com liable if you kill, burn, mangle yourself or your computer. However, in the event of your winning the lottery, the author is entitled to 10% of all winnings.
|
|
|
|
|
With the disclaimer out of the way, it is important to start with some basics of dealing with alternate current (AC) wiring as well as some important safety issues. First and foremost, if dealing with soldering or electrical wiring makes you nervous, get someone else to do it for you! Next, you need to be aware of how AC wiring differs from direct current (DC) wiring normally found in computers. DC wiring is simply positive and ground, and when starting to wire an AC pump, one will immediately notice that there are three wires instead of two. The wires are labeled as live, neutral, and ground. While there is not a standard wire color for these lines, ground is typically green, live is usually black or brown, and neutral is usually white or blue. The explanation for why the live and neutral wires are needed comes from how voltage travels in DC vs. AC systems. DC voltage is continuously traveling through the positive (3.3V, 5.5V, and 12V) wires coming from your PSU in one direction. AC wiring is somewhat different, as the direction of flow periodically reverses itself and creates a waveform. For an interesting discussion of how AC appliances (and houses) are wired, check out this link. If you read that page, you will understand that the ground wire (third prong) is a loop that doesn't carry voltage. This means that you are perfectly safe to connect the ground wire of your pump to the steel or aluminum of your case frame. In fact, this is preferable because multiple ground loops introduce the possibility of shorts that may damage your electronics components.
There are some important things to remember when wiring AC power into your case:
- If you are wiring your pump into the PSU's existing plug or switch, make sure the PSU doesn't still carry a charge. The capacitors in a PSU can hold enough power to hurt you. I have read some forum posts indicating that capacitors in standard ATX PSUs drain rapidly, but I have also read that some capacitors maintain a charge for more than a day. To be safe, either wait a few days after unplugging the power supply or discharge the capacitors. To discharge capacitors quickly, you can simply touch an insulated screwdriver to the contacts of the capacitors. However, this rapid discharging is hard on capacitors, and so the recommended method by electricians is to use a 2 Watt 100 ohms resistor instead of a screwdriver. Then use a voltmeter to verify that there is no voltage remaining.
- Make sure all connections are wrapped in heatshrink, and are in no danger of coming loose or being exposed.
- Don't touch any contacts under the PSU without caution. They may carry power.
- Never wire AC power so that you leave live connections exposed. This means that if you are wiring a second socket into your case, use the female end to carry the voltage; don't have live prongs from a male end exposed. This is a huge danger!
|
|
With the above safety precautions in place, there are several different aspects of pump wiring that you may want to try. I am going to cover the following methods with diagrams and some discussion:
- Wiring a pump directly into your PSU's plug
- Wiring a second plug and switch for your pump
- Adding a relay to automatically power on your pump with the computer
- Using LED indicators to see that the pump has power
|
|
|
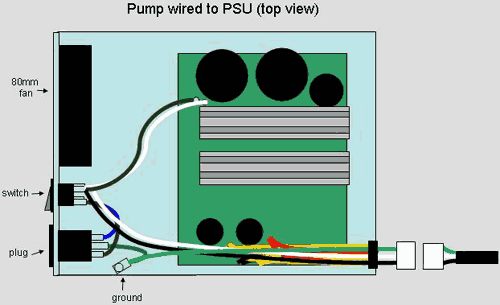
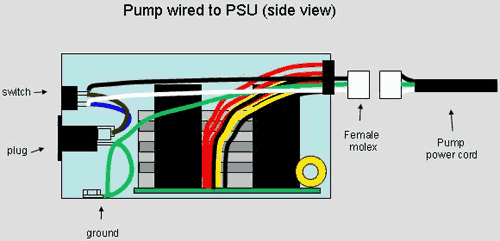
Wiring a pump directly into your PSU's plug
|
|
|
This method seems to be the most popular way to wire pumps at ProCooling, with the pumps in Pro Mini, DH3, Little Stealth 2, and Micro Stealth all being wired this way. There are a couple of big advantages to handling your wiring this way. First of all, there is no possibility of the PC running without the pump being powered. Additionally, this method is very simple to perform and requires no additional parts. The drawbacks are that it will void the warranty on the PSU and it can sometimes add a bit of trouble to changing out pumps or PSUs.
If you are going to wire a pump to the PSU, there are a few options that you have.
First of all, you can either wire the pump directly to the PSU (as UnaClocker does in Little Stealth 2 and Micro Stealth). This is the simplest solution, but it may become a bit problematic if you need to swap or move around your pump for some reason. I typically use a Molex type connector, with the female end connected to the PSU and the male end connected to the pump. That way, I can just unplug the pump if needed without having to gut the power supply from my case. The other option that you have is whether to wire the pump directly to the plug of the PSU or to the switch. This falls in the category of personal preference. If the PSU has a switch, I wire it to the switch. Otherwise, I wire it directly to the plug.
|
|
 |
|
|
 |
|
|
It is, of course, possible to wire the ground into the plug rather than bolt it to the PSU, but I always bolt the ground of my pumps to the case metal rather than running the risk of a second ground loop through the system.
|
|
|
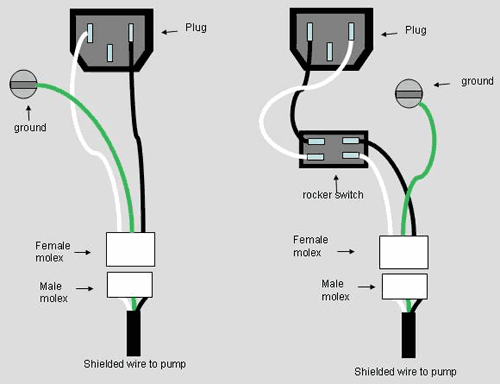
Wiring a Pump to a Second Plug
|
|
|
I swap out my PSU pumps fairly regularly, so I decided to add a second plug on the back of my case rather than hard wiring the pump into the PSU. The big advantage of this is ease of use: it is possible to fill/bleed your cooling system without a PSU in the case, and it is easier to swap out PSUs. There are two drawbacks to this method though. First and foremost, if you have a switch on this plug then it is possible for the pump to be turned off while the system is on. You can get around this by just skipping the switch. The second drawback is that it adds another plug and cable to the back of your case, and that you have to cut a hole in the case to mount the plug. Neither of these were big deals to me.
I cannibalized an old, dead AT PSU for its plug, but I recently found a cheap source for the socket and switch online. The wiring of the pump to a socket or switch is pretty straightforward (identical to the wiring of the pump to the PSU, in fact).
|
|
 |
|
|
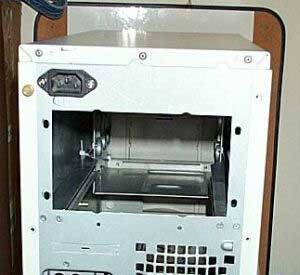
As mentioned, I always bolt the ground to the frame of my case. Here is a picture of the socket on the rear of my old Antec SX1030:
|
|
 |
|
|
|
Next Dr. pH gets into using a Relay!  |
|
|
|
| Random Forum Pic |
 |
| From Thread: Attention All 4100 owners |
|
| | ProCooling Poll: |
| So why the hell not? |
|
I agree!
|
 67% 67%
|
|
What?
|
 17% 17%
|
|
Hell NO!
|
 0% 0%
|
|
Worst Poll Ever.
|
 17% 17%
|
Total Votes:18Please Login to Vote!
|
|


