|
|
|
|
 Cooling Technologies Explained Cooling Technologies Explained
|
|
Date Posted: Feb 16 2002
|
|
Author: The ProCooling Team
|
|
|
|
|
Posting Type: Article
|
|
Category: FAQ's, Editorials, Q&A's
|
|
Page: 3 of 8
|
|
Article Rank:No Rank Yet
Must Log In to Rank This Article
|
|
|
|
|
Note: This is a legacy article, imported from old code. Due to this some items on the page may not function as expected. Links, Colors, and some images may not be set correctly.
|
|
|
Cooling Technologies Explained By: The ProCooling Team
|
|
|
|
3/24/02 - Team Article - By: Brian, Brad, pHaestus and Joe
|
|
Phase Change Cooling-(Continued) By: Brian
|
|
|
|
Simple Mini-Fridge Optimizations
The consumer mini-fridge is designed to keep the interior at low temperatures, but not well below freezing. Also, it is designed to be energy efficient. Giving up efficiency and some money, it is possible to lower the temperature.
First, the system is probably undercharged. Add a small bit of R-134a (the most common refrigerant) and temperatures will likely drop. Unfortunately, it is difficult to tell how much to add. If you add too much, the system will become very inefficient and evaporator temperatures will rise. Add a bit more and you risk the compressor. If liquid refrigerant ever makes it back to the compressor, the compressor will try to compress an incompressible liquid. Needless to say, the compressor will lose and it will destroy itself in the process. The best method is to chart the evaporator temperatures as you add and subtract refrigerant. Use a piercing saddle valve to add and subtract refrigerant. You can pickup cans of R-134a at a local auto repair store.
Second, try refrigerant additives. R-134a is not a single gas; it is a blend of around three different gases. Usually it is based upon butane with some other additives to prevent flammability and to increase the phase change efficiency. Some very smart scientists have designed an additive specifically used for R-134a systems: QwikBoost. With the use of about 10% QwikBoost, the evaporator temp might drop to around -20C, depending upon your compressor. Steve Foster was the first to use QwikBoost (that I know of) in a PC cooling system here. He achieved -25C, but the compressor was fairly good. It could displace 1655 BTU/hr instead of the more normal 600-800 BTU/hr that a normal mini-fridge can move.
Third, try improving the heat transfer from the evaporator to the CPU. Methanol is better than antifreeze for transferring heat, but it will not prevent corrosion. It also might dissolve certain types of gaskets.
|
|
Water Chiller
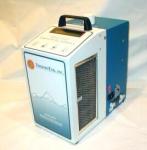
I particularly like the substitution of a commercial water cooler for the mini-fridge. Using a system designed to keep a liquid cool certainly takes care of a number of modifications up front. It is already designed to efficiently cool a liquid. It is already in an attractive form. The only real modification necessary is to pump the chilled water to the CPU waterblock.
What NOT To Do:
First, the R-134a refrigerant is not particularly good for really low temperatures. Since R-12 and R22, for example, are much better at transferring heat, one might think that a simple replacement would help. It does not. In the best case, using the wrong refrigerant will not work. The wrong refrigerant will have a different boiling temperature so it might not even change phase. Worse, the compressor is at risk. If it never boils, the liquid coming back around will destroy the compressor, just as if you added too much of the correct refrigerant. The wrong refrigerant might react with the normal lubrication in the compressor and create byproducts like hydrofluoric acid (which will eat up the compressor). Finally, a compressor is simply designed for a certain refrigerant. A compressor has a stroke length, bore size, RPM and torque level. All of those factors are designed to work well with a specific refrigerant.
Second, do not allow refrigerant to come in contact with water or an open flame. R-12, for example, creates phosgene gas when it burns. Phosgene gas is a nerve gas that was used in World War II, and it can kill. Also, many of the refrigerants will create hydrofluoric acid when they come in contact with water and/or fire. Hydrofluoric acid will leave no mark on the skin, but it will dissolve bones. Fifteen minutes later, you might have lost a major bone, and there is no treatment that I know of. The only treatment is not to get exposed in the first place!
|
|
Advanced: Creating Your Own System
If you have the urge to go -40F, there is only one easy solution. You must create your own system. However, this is not for the faint of heart. You must be able to work with copper tubing to bend it without creating kinks. You must be able to solder joints together in copper tubing. You must be able to evacuate a system with a vacuum pump. You must be able to work with refrigerant gases without dumping them into the atmosphere (dumping is illegal).
I will try to explain the basics of some these skills. However, be sure to practice before you try it for real. Don't ruin a $150 compressor because you don't know how to solder two copper pipes together! I cannot explain all the details, but you should have enough details to ask intelligent questions and get some of the equipment.
Working with copper tubing is not hard once you know how, but it is easy to put permanent kinks into it. The professionals use two main methods to work with hard bend requirements. For the tightest bends, simply solder in a 90 copper elbow joint. However, a pipe bender tool will help create smoother bends without adding a flow restricting elbow joint. A local hardware store should have a pipe bender.
You will also need a copper pipe cutter. A pipe cutter is cheap and essential, but some cleanup is necessary after cutting the tube. Usually, the pipe cutter includes a wedge that is used to remove the burr inside the tube. Don't forget to clean up that inside.
Soldering copper pipe is required because gaskets and fittings will not hold the pressure (about 150 PSI in the normal case). To solder two pipes together, one must slide inside the other for a short distance. To create the joint, use a tube flare tool to expand the inside diameter for one of the two pipes. Then, ensure that the inside and outside of both pipes are cleaned (use iron wool). Apply a light amount of flux on the outside of one pipe and the inside of the other pipe so that the flux will clean the surfaces that will come in contact with each other. Then, slide the pipes together. Use a torch to heat up the joint (making sure to constantly move the flame) and then apply some solder. The solder should wick into the joint if the joint was well heated. Done! You can undo the soldered joint by heating it up and forcing the joint apart.
Evacuating a system is not hard if you have a vacuum pump. First, it must be capable of going down to 29" of vacuum. The point of the vacuum is not just to remove the "normal" air. It is primarily remove any water from the inside. Water droplets can freeze up and cause a blockage in the system that could burn up the compressor. So, the air is evacuated to boil off any water. Here is an OK technical article on evacuation by the National Compressor Exchange.
Usually, the air is evacuated from an access pipe that is soldered onto a pipe on the intake or discharge side of the compressor. A piercing saddle valve is put onto it temporarily while the system is evacuated and then charged. When the system is working well, use some vice grips to pinch off the access pipe and solder close the pipe just above that pinch point.
Dealing with used refrigerant is important as well. US law requires that refrigerant be recovered and dumped at an approved site. The vacuum pump can dump the used refrigerant from an existing system into a compressed gas "bottle". I won't go into too much detail here, because it is part of HVAC certification. If you intend on doing this, it will be covered in the legal portion of your certification course. It is the law.
|
|
|
|
|
Picking Parts
Before picking any part, some ground rules have to be laid down. It may be illegal to use R-12 and some of the other refrigerants that have been discussed. Federal or state laws of your country or state/province may limit maintenance and creation of refrigeration devices to HVAC certified technicians. Be that as it may, this guide simply says how it could be done and it does not suggest that you should or could implement any of those suggestions. Remember, these laws exist to protect individuals from harm and to protect the community as a whole from harm (e.g. from environmental damage).
The first decision is what the target temperature should be. If you wish to keep your CPU at near normal temperatures such as 10C it will be very different from targeting -80C. For example, going anywhere below -40C will require a cascaded system, where one refrigeration loop cools a differently designed secondary loop. In extreme examples, three loops are cascaded together, because phase-change cooling loops can only create a limited temperature differential. The outer loop might cool from ambient down to -30C, the middle loop might go from -30C to -120C and the final loop might go all the way from -120C to –240C. Please note that the temperatures that I just quoted are made up, in case you thought it was a real example.
|
|
|
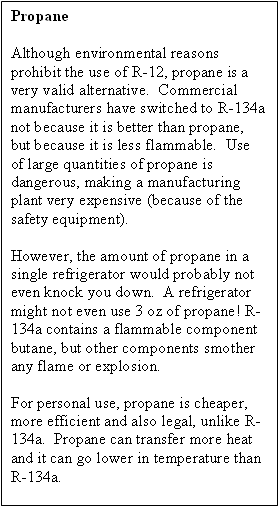
Different refrigerants have different properties that make them useable for different target temperatures. R-134a, for instance, has a boiling temperature of about -17F at one atmosphere of pressure, R-12 boils at about –21.6F, and R22 boils at about –42F. Propane is almost identical to R-12 but it is not illegal to use because it is not an ozone-destroying CFC.
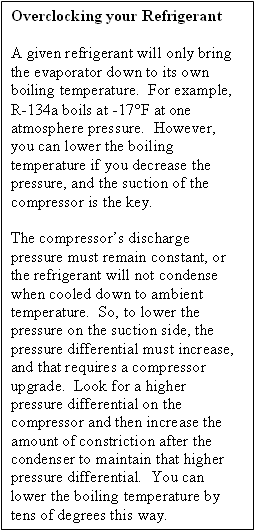
A realistic goal might be -20C, like Steve Foster did here. In this case, you would need to have a refrigerant that could cool down to that temperature or nearby (see sidebar on overclocking your refrigerant). You would also need a compressor that worked with that refrigerant, moved enough BTU's/hr, and a great heat delivery system. I recommend R-12 compressors because you can use cheap (and good performing) propane with them.
A 1600 BTU/hr model will be overkill, but it is certainly guaranteed to maintain a low temperature. The Grainger website has HVAC components and systems. I recommend starting there for parts. Start looking at compressors and condensing units. If you want to do more soldering, buy a compressor and scavenge a condenser and an evaporator from a discarded refrigerator. Otherwise, get a condensing unit (includes a compressor, a dryer and a condenser) and then solder on a good evaporator.
An example compressor at Grainger's site is the Copeland AFT12C1-IAA-901. It can move 1563 BTU/hr of heat (about 450W of heat), and it uses R-12. Propane is guaranteed to work in any R-12 system, but R-134a is not. Remember, R-134a will eat up a system designed for R-12.
The condensing units on Grainger's do not show enough information to help, unfortunately. They state the refrigerant type, but they do not state the heat dumping
|
|
|
|
|
capability of the condenser unit, nor do they state the ability of the compressor to move heat (in BTU/hr). Talk to your local Grainger branch or talk to a local HVAC technician.
|
|
|
|
|
|
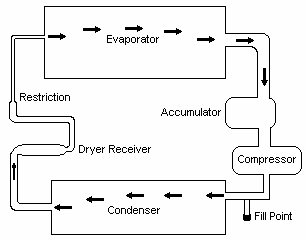
Assuming you have a compressor, a condenser, and an evaporator, the next step is the thermal expansion valve or capillary tube to restrict flow from the condenser to the evaporator. Luckily, the compressor manufacturer specifies the capillary tube ID (inside diameter) and length. For example, contact Copeland via the web or phone for information about a specific Copeland compressor.
More parts are required: a dryer receiver, an accumulator, and several sizes of copper tubing. Also, you will want some sort of setup to transmit the CPU heat to the evaporator.
The dryer receiver is used to capture any water in the system and to prevent gas from going to the evaporator. The dryer is positioned just after the condenser but before the capillary tube (or thermal expansion valve). When attaching it to the condenser, ensure that it points downwards. By pointing it down, the heavier liquid will settle at the bottom and allow only liquid to move onto the evaporative stage. Grainger's has dryer receivers as does any local refrigeration or HVAC repair business.
The accumulator is used to hold any excess liquid refrigerant after the evaporator. Positioned directly after the evaporator and before the compressor, it is just a big bulb. The bulb should have an output at the top which angles upwards to the compressor, so that only gas makes it to the compressor. This angled output traps liquid in the bulb to prevent the compressor from destroying itself by trying to compress a liquid. Please note that this is a safety measure that may not be necessary. If the capillary tube is properly specified, or the thermal expansion valve is hooked up correctly, only gas will come out of the evaporator. A thermometer attached to the suction side of the compressor can control the thermal expansion valve. This will allow it to constrict more (reducing flow) if liquid might start reaching the compressor.
|
|
|
 |
|
|
|
The evaporator should probably cool a secondary loop instead of trying to cool the CPU directly. When refrigerant evaporates, it boils just like water, creating bubbles that eventually move onward. This creates uneven temperatures with localized hot spots (bad for a CPU, if you didn't guess!). Also, refrigerant cannot move vast amounts of heat in a small area like fast moving water can. For these reasons, I suggest using a water and antifreeze mixture to move heat from a normal waterblock to the evaporator.
Simply use a big basin to submerge the evaporator, and use a submersible pump to move the chilled water to a standard waterblock. I suggest water and methanol for superior heat transfer or water and anti-freeze (ethylene glycol) for corrosion resistance. Methanol can transfer heat better, but if dissimilar metals exist (e.g. copper waterblock and aluminum evaporator), the metals will corrode each other. If you can use an aluminum waterblock, go with the water/methanol mixture. Pure methanol can go down to -60C, although the pump might need to be watched for brittle fractures or methanol induced seal degradation.
Needless to say, the liquid lines going to the CPU waterblock need to be heavily insulated. Also, the CPU requires insulation and waterproofing. See this article on ProCooling for an excellent article on practical temperature proofing for your CPU and motherboard.
The fill point should be a T addition to the pipe going into the suction side of the compressor or the discharge side (either works). Solder a T junction into the pipe and then solder a length of tubing onto that T. I would put a "Refrigeration Access Valve" (available at Grainger's for about eight dollars) on there permanently, although you can take it off later and solder it shut.
|
|
|
Wrap up on Phase Change, and pH's look at Hybrid Cooling Tech  |
|
|
|
| Random Forum Pic |
 |
| From Thread: Another idea for peltier cooling |
|
| | ProCooling Poll: |
| So why the hell not? |
|
I agree!
|
 67% 67%
|
|
What?
|
 17% 17%
|
|
Hell NO!
|
 0% 0%
|
|
Worst Poll Ever.
|
 17% 17%
|
Total Votes:18Please Login to Vote!
|
|


 Cooling Technologies Explained


