|
|
|
|
 Crystalfontz CFA-635 LCD Review Crystalfontz CFA-635 LCD Review
|
|
Date Posted: Dec 17 2005
|
|
Author: Joe
|
|
Index:
|
|
|
Posting Type: Review
|
|
Category: Thermal Management Reviews
|
|
Page: 3 of 4
|
Article Rank: from 2 Readers
Must Log In to Rank This Article from 2 Readers
Must Log In to Rank This Article
|
|
Forum Discussion Link
|
|
|
|
Crystalfontz CFA-635 LCD Review By: Joe
|
Using the CF635:
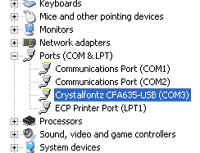
To install the CFA-635 in Windows it’s quite simple, just plug it into the USB header on your motherboard or the external jack depending on which cable you have. Crystalfontz has USB drivers on their website to download (Here). Install the CF as if it was any other USB device. In the end you will get 2 devices added to your device list. One USB device and one Comport device. The CFA-635 makes another com port on the system and lives there as you can see in this pic:
I am not going to go over installing the hardware for CFA-635 simply because it’s fairly elementary. You plug stuff into the proper ports and go. The complex part of getting all you can from a device like this is in the software config and setup. The process to get all the features of the CFA-635 working can be a complex process that could take a day of fiddling to get what you want out of it. As pH stated before this device is for the enthusiast more than just a normal end user.
The 635 Win test software:
Well Crystalfontz has improved on the complexity of the process quite a bit from the CFA-633 days, making the power of this device available much more user friendly. While its easier to setup, they havent eliminated any features. There are some things that I think you will still need to do manually, the bulk of the products features are clearly presented in the CrystalControl 2 software. The other main app for this device is the 635_WinTest program. This gives you a direct interface to all the features of the LCD, and access to program the device for special functions. Here’s some pics of what the Win test interface looks like:
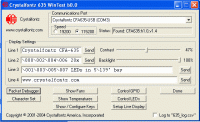 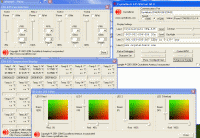 
The first pic is the general front page for the Win test software its pretty self explanatory. You can run tests, and pretty much probe every part of the CFA-635. The second pic shows some of the stuff you can play with and test the device out with (and with the packet debugger you can see what commands are issued for a certain action so you can possibly write custom code to exploit all the fun parts of this device).
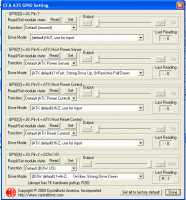
The last pic above is an interesting one. It controls the GPIO pins on the SCAB board. You can see in the pic’s on the previous page the extra set of pins on the SCAB board that are not connected to anything. Those are the GPIO pins. With the GPIO cable you can control a few different aspects of the PC such as the ATX PSU power up/power down, and more. That’s mainly for white box mfg's who want to integrate the CFA-635 into a rack server or something... but could also be powerful for a high end geek. 
Crystal Control 2 (aka CC2):
The original Crystal Control was pretty much just there to display stuff on the LCD from user made screens. Building screens was stupid simple and the whole thing was pretty straight forward. The big complexity came in with needing to use the CFA-633 Service to run the device and have crystal control interface with it.
CC2's main purpose now is to control all aspects of the CFA-635 for an end user very simply. It presents all the main functions a user will need in a single clean interface. No more having to hack INI files and hotwire app's to work together. When CC2 is installed it just throws a small icon like this  on the taskbar and waits for you to configure it. The drill to get it setup is this: You right click on the icon, pick Configure, add in the CF635, restart CC2, then setup your fans/temp/screens. Now let’s go over this in a little more detail: on the taskbar and waits for you to configure it. The drill to get it setup is this: You right click on the icon, pick Configure, add in the CF635, restart CC2, then setup your fans/temp/screens. Now let’s go over this in a little more detail:
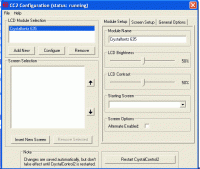 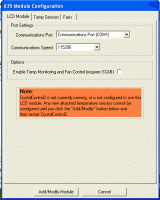
Above you see the simple look of the CC2 interface, and the image to the right shows what screen you are presented when you install the CFA-635. You must check the SCAB option in order to manage the temps and fan's connected to the device.
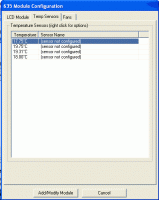 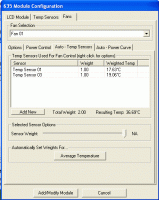 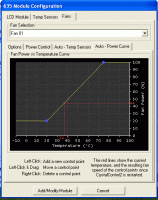
Once you have set up the CFA-635, you can go into the fun areas in the software and get down to business setting up the fan speed controls and temp sensors. You need to setup each temp probe first, then once you have done that you can add them to the fans. One big area of improvement now over the CFA-633 service is that you can now bind multiple temp sensors to one fan and weight them differently. This is nice where if you see intake temps going up, yet the CPU is still cool (maybe not being used too hard) based on what you tell it the weight is of those it may not move the fans much faster at all.
Then you get into setting up the fan speed curves in a nice graphical interface. This makes it nearly stupid proof to setup all this. In the CFA-633 Service, all this pretty much needed to be done in INI files, and it could be a bit cryptic on what changes you were making.
The different screens available in CC2 to display stuff like your current BF2 ranking and stats, current world news, Fan RPM and Temps, network or CPU or memory utilization, etc... are quite nice. The fact it comes with what seems 30+ screens all prefab and ready to go makes your life easier. Here’s a pic of the screens dir that comes with it:
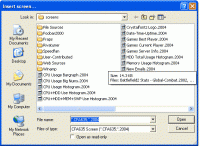
An important note is that those screens were made for more than the CFA-635, and could include screens meant for graphical LCD's and wont display right on the 635 since its a character based LCD. But many of them do work great.
Now that we know how to just use it normally, lets see what tweaks are available.
|
|
|
|
|
| Random Forum Pic |
 |
| From Thread: First PC Done, Soon to Be Watercooling From External Box |
|
| | ProCooling Poll: |
| So why the hell not? |
|
I agree!
|
 67% 67%
|
|
What?
|
 17% 17%
|
|
Hell NO!
|
 0% 0%
|
|
Worst Poll Ever.
|
 17% 17%
|
Total Votes:18Please Login to Vote!
|
|


