|
|
|
|
 Soldam MT2200+ Case Review Soldam MT2200+ Case Review
|
|
Date Posted: Jun 12 2002
|
|
Author: Beav
|
|
|
|
|
Posting Type: Review
|
|
Category: Case Reviews
|
|
Page: 1 of 2
|
|
Article Rank:No Rank Yet
Must Log In to Rank This Article
|
|
|
|
|
Note: This is a legacy article, imported from old code. Due to this some items on the page may not function as expected. Links, Colors, and some images may not be set correctly.
|
|
|
Soldam MT2200+ Case Review By: Beav
|
|
Beav's Soldam MT2200 Plus Case Review
|
|
By Beav - 6/12/02
|
|
|
Aluminum enclosures have earned quite a favorable reputation in the last year or two among computer hobbyists/enthusiasts.
Manufacturers tout the questionable ability of aluminum to move heat away from your components more efficiently than the standard steel enclosures, but most people are attracted to their feather-light weight and extremely chic appearance. The brushed metal or high-gloss appearance of Lian Li and Coolermaster cases have become the pinnacle of badass for many PC enthusiasts. A year ago, only a few online retailers could be found selling those Lian Li gems but now you can drive down to your local computer retailer and find them on the shelves. If you own one of these beauties, your reason for purchase is more than likely for its aesthetic appeal. An equally priced steel enclosure will provide you with many more useful features, and a broader range of functionality than its typical aluminum brethren, such as easy access, efficient interior layout, removable drive bays, motherboard trays, doors; handles, hinges, snaps etc. While some aluminum manufacturers include some of these features, they only touch the tip of the iceberg.
SOLDAM Corporation, a Japanese based manufacturer, has been producing fantastic cases, (their most famous line dubbed "WiNDy") for the past 5 years. Unfortunately, very few people have heard of this company. All of their
cases/lines are extremely functional and unique to the market. SOLDAM takes a different approach to computer enclosures. They erase the line between being a beautiful piece of art, and a useful, scalable, powerful enclosure.
Their line ranges from the polo-t ™, (big enough to only hold 1 5 ¼" bay), to full tower enclosures like the MT-3000. Today, we will be looking at their top of the line mid-tower, the MT-2200 plus, raking it at up to $600
with shipping. *ouch*
|
|
 |
|
 |
|
|
|
|
|
|
|
|
|
|
The MT2200 plus:
|
|
|
On first inspection, the MT2200+ is an extremely deep enclosure, measuring in at 21 7/8". Here are some of the case's specs, pulled from the manufacturer's
website.
- Weight: 19lbs
- 5.25" Bays: 5
- 3.5" Bays: 3
- 3.5" Inner bays: 14
- Case Fans: 7
- Dimensions: 21 7/8" L x 8 ¼" W x 19 ½" H
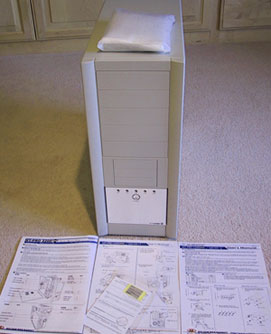
Soldam included a huge array of screws and mounting hardware with the case: six 4 pin to 3 pin power adapters, five green LED's, four rubber padded feet, the
default power button, detailed instructions, and a partridge in a pear tree. Case assembly rarely merits detailed instructions, but with so many sliding cages, trays, and panels, one may get confused. I ordered my MT2200+ with
two option kits, and both were pre-installed. The hinged door was put in place, along with the flashy aluminum feet, an aluminum power button, and the five blue LEDs. One other subtle detail that I noticed was that everything
came packaged in its own re-sealable bag.
|
|
|
Click Here to download a Adobe Acrobat file containing the User Manual Pages for this case. (2.16Mb)
|
|
|
|
Journey to the center of the case:
|
|
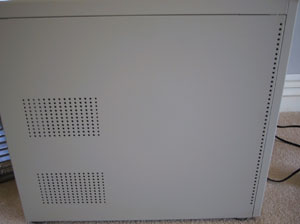
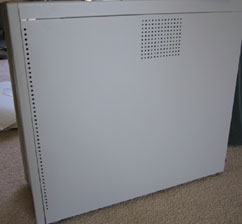
Unlike most of the aluminum cases currently on the market, the MT2200+ only has a patch of the familiar brushed aluminum look. The rest of the case is powder
coated in the typical, beige color. In addition, the front bezel is constructed from ABS plastic, instead of aluminum to match the rest of the case. While the MT2200+ tends to stray from the flashy more modern look, it has its
own aesthetic appeal; a more mature and classy feel.
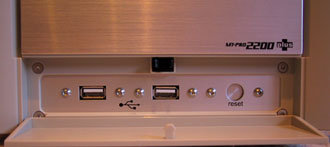
A little push on the plastic below the aluminum reveals 2 USB ports, and the reset button.
|
|
|
|
|
|
|
 |
|
|
|
 |
|
|
|
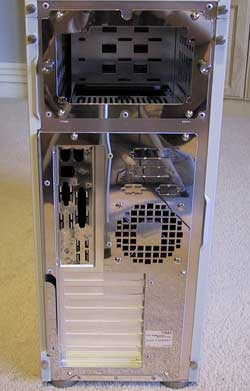
The back is quite a contrast with the rest of the outside appearance of the case; everything is polished to a brilliant sheen. From the back, you
can see the removable PSU tray and the motherboard tray. Take notice of the lipped handles for the doors and motherboard tray; while not a necessity, they are definitely nice to have.
|
|
|
|
|
|
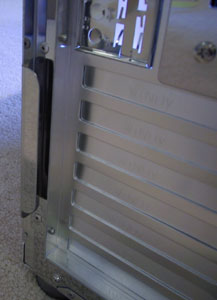
Both panels have patches of perforated holes, which give decent ventilation for the included fans. There are two vents on the left door, and one unusually
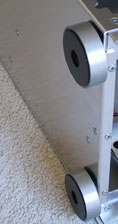
placed vent on the right door. Also notice the column of holes towards the front of the panels, which give some breathing room for the front intake. The aluminum feet, which come as an option with the MT2200+, are much better
than the ones that come with the default configuration. The standard feet are really small and would probably "pop" off easily if the case were to be tilted on its side. The optional feet have much more surface area to stably
support the case.
|
|
Notice the column of holes near the front giving the front intake some breathing room
|
|
Now that we have covered the outside aspects of the MT2200+, let's start taking this case apart! Both the side panels and the top panel are held in place by two
thumbscrews. I found the left panel to be quite stubborn. The lipped handles on the side panels, although a nice idea, are way too small to grip properly. It took a fair amount of tugging and pulling to pry the panel off. Once
the side panel was removed, I was greeted with a generous amount of space, and a brilliant sheen, as the whole interior was polished. The optional kit is quite stunning. The handle on this hinged door is effective, unlike the
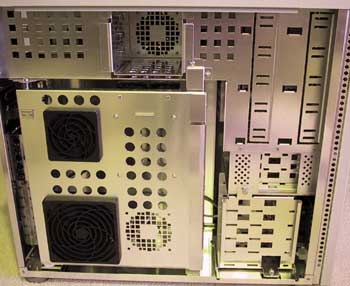
ones on the panel. The build quality of this case really shines when you crack the MT2200+ open. From this picture, you can see the many 3.5" drive bays, most of which easily slide out on guide rails. Also notice the depth and
space this case provides.
|
|
 |
|
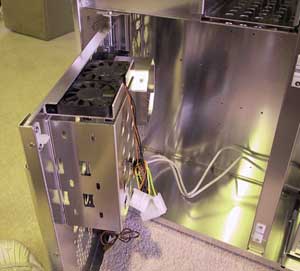
The hinged door is clasped to the main chassis with sturdy little snaps. The plastic snaps look like they can take repeated abuse over a long period of time. On
the inside of the door are a 120mm and 80mm WiNDy case fans, with an open spot for another 80mm on the door. The WiNDy case fans are fantastic, producing decent airflow, at a relatively low noise. Here are the specs of the 80
and 120mm fans, as posted by the manufacturer: WiNDy120: 1550rpm @ 27db WiNDy80: 1900rpm @ 20dB. Unfortunately, they don't post the CFM ratings, making it hard to realize the true output of these fans. Two more 3.5" bays sit
ready for your disposal on the optional door, with two low profile 60mm fans on top to exhaust the heat. I don't see this to be very effective, as you would have to disconnect the hard drives every time you needed to open your
case. Another problem I encountered was the open space for another 80mm fan. The door panel doesn't have a vent space for this extra fan, rendering it quite useless. The shrouded 80mm fan on the door is a good idea if it lines
up with your CPU, but won't work effectively with every motherboard. For example, I'm putting a dual motherboard in this case, thus positioning the fan+shroud
at the void between both CPU's. Fortunately, both the 3.5" bays and the shroud can be easily removed.
The extra 3.5" bays are unnecessary, making it a pain to open your case, especially when there is space for twelve more 3.5" devices.
|
|
 |
|
|
The shroud isn't effective on all motherboards
|
|
|
|
|
|
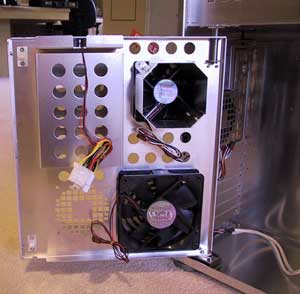
The top drive cage, located between the PSU cage and 5 ¼" bays, can house up to four more 3.5" devices, or a nice sized reservoir . Another 80mm WiNDy fan
exhausts the heat from devices in this cage out the right side. Down below the 5 ¼" bays, is yet another cage to house 5 more 3.5" devices. This cage slides out easily once you remove the 2 screws securing it to the chassis. I
found it rather crowded at the front of the case, as all of the LED's, USB, and power/reset cables are stringing in from the front bezel, along with the PC speaker and intake fan. This is a problem I have seen in many aluminum
cases by Lian Li which have the monster HD cages.
|
|
|
|
 |
|
|
|
|
|
|
The Front ABS plastic bezel pops off easily, but the total removal of the bezel is a major annoyance. Instead of having all of the LED's and switches stationed
on the main chassis, SOLDAM, decided to bolt everything to the actually plastic bezel, requiring you to fish the wires through the openings in the case.
|
|
 |
|
|
A really annoying aspect of this case.
|
|
|
|
More Expensive Case Goodness this way
 |
|
|
|
|
| Random Forum Pic |
 |
| From Thread: Chieftec big tower wc'ing in progress |
|
| | ProCooling Poll: |
| So why the hell not? |
|
I agree!
|
 67% 67%
|
|
What?
|
 17% 17%
|
|
Hell NO!
|
 0% 0%
|
|
Worst Poll Ever.
|
 17% 17%
|
Total Votes:18Please Login to Vote!
|
|