|
|
|
|
 Micro Stealth Micro Stealth
|
|
Date Posted: May 10 2001
|
|
Author: Unaclocker
|
|
|
|
|
Posting Type: Article
|
|
Category: ProCooling Projects
|
|
Page: 2 of 3
|
|
Article Rank:No Rank Yet
Must Log In to Rank This Article
|
|
|
|
|
Note: This is a legacy article, imported from old code. Due to this some items on the page may not function as expected. Links, Colors, and some images may not be set correctly.
|
|
|
Micro Stealth By: Unaclocker
|
|
|
|
Hmm.. something is wrong here...
|
|
 |
|
|
|
|
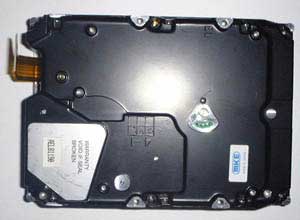
The hard drive was a whole other fiasco. I jumped on what looked like a good deal on Ebay; $20 for a 10gig. When it arrived, it didn't have the circuit board on the bottom of the drive. There were only some cables dangling off where the board used to be. First time I've really been conned on Ebay, but still very frustrating. So instead, I said goodbye to my raid array on my good machine and donated one of my 7200rpm 13gig Maxtors to use in this machine. I'll call it a $75 drive.
Ok, that covers the electronics. Not counting the $30 I lost on Ebay, the computer has $300 worth of parts in it (assuming it has the 24x CDRom, and not my DVD drive in it). Now lets move on to the cooling system.
|
|
|
|
|
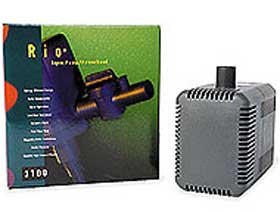
I suppose the primary part of a cooling system is the pump. For this, I went with the absolute cheapest one I could find that would still pump enough water to do the job. I chose the Rio 180. I found it for $12 plus S/H online. I was able to get one for $12 shipped from a friend that purchased them in bulk. Now, I don't want anyone to think I condone Rio's. They are notorious for going bad at just the wrong time. My reasoning here was that the CPU is only worth $40 so it's not the end of the world if the pump dies. Another problem with Rio's is that they tend to rattle (actually, a lot of magdrive pumps do that) under load. There is a simple trick to fix that which involves simply superglueing the impeller to the magnet so that the impeller doesn't rotate a half turn back and forth before catching. This trick may even make Rio's more reliable, but I don't have any proof of that.
|
|
|
|
|
|
|
|
I also needed a waterblock. I still had the 2CoolComputer waterblock laying around from last year. I've since lapped the block so that it's actually flat, which makes it perform better. It's still a pain to mount because I don't have a decent clip for it, but I came up with a contraption that uses the socket A holes that works well. I'd say this is a $20 block, even if it does cost twice that.
|
|
|
|
|
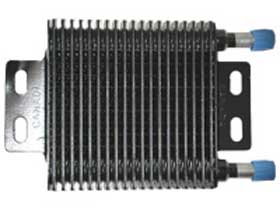
I went with a 4x4 low pressure drop radiator, as seen on Overclock-Watercool and CaseEtc. OCWC was nice enough to provide me one free of charge for this article. I thank him immensely, as I was definitely on a tight budget with this machine. I also used a slim 92mm fan I had laying around with this radiator. Besides the fact that this radiator was free, I did pick it for a specific reason. The design of this radiator compared to a standard tube fin radiator is more open so it won't get clogged with dust as easily as a standard radiator would. Once a radiator is completely clogged, it might as well be running without a fan because no air will flow through it. Since this machine is going to my mother, and I live almost 200 miles away from her, the machine needs to be able to run 2-3months at a time without being dusted or otherwise maintained. These radiators usually run $40.
|
|
|
|
|
|
|
|
|
|
|
|
|
|
|
|
|
|
|
 |
|
|
|
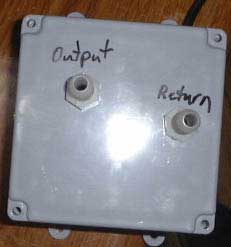
The reservoir was pretty simple. I needed something small, yet still able to hold a pump that is designed to be submersible only. I went with a 4x4x2 marine electrical junction box. I also picked up some hose barbs for it. That ran me $11 at the hardware store.
And that's everything. The hose I used was just scraps leftover from the last watercooled computer I had built. So the cost of the watercooling system was about $80.
|
|
|
|
|
|
After
|
|
|
 |
|
|
Before
|
|
|
When I got the reservoir home and started trying to find a home for it in the case, I noticed a spot that it looked like it might fit into. I couldn't believe my eyes when it actually fit. As you can see, this spot is absolutely perfect. This spot keeps the reservoir at the highest point in the system so that the air bubbles stay at the top of the reservoir. It also keeps it out of the way of everything in the system. Can't get much better than this.
|
 |
|
|
|
 |
|
|
|
|
|
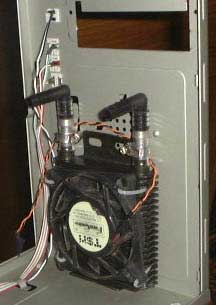
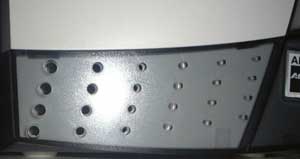
As for the radiator, I mounted that in the front. As you can see here, the case is designed with holes on the front and slits in the side that allow for good air intake.
|
|
|
|
|
|
 |
|
|
|
|
|
|
|
 |
|
|
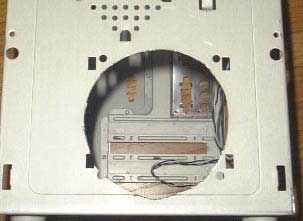
I did need to cut a larger opening in the front of the case behind the faceplate so that the fan could get a good flow of air through the radiator. I used a dremel to cut the hole, and it came out nearly perfect.
|
|
|
|
|
|
|
|
 |
|
|
Once I had the hole cut out, I used some trusty zip ties to hold the fan and radiator against the front of the case.
|
|
|
|
|
|
|
|
One complaint I had with the radiator was that it didn't come with elbows on it. The hoses just come straight off the top, but OCWC included some elbows with it for me which I used directly over the radiator fittings.
|
|
|
|
|
| Random Forum Pic |
 |
| From Thread: can we agree on the basis of "C" in C/W ? |
|
| | ProCooling Poll: |
| So why the hell not? |
|
I agree!
|
 67% 67%
|
|
What?
|
 17% 17%
|
|
Hell NO!
|
 0% 0%
|
|
Worst Poll Ever.
|
 17% 17%
|
Total Votes:18Please Login to Vote!
|
|