|
|
|
|
 Little Stealth 2 Little Stealth 2
|
|
Date Posted: Mar 18 2001
|
|
Author: Unaclocker
|
|
|
|
|
Posting Type: Article
|
|
Category: ProCooling Projects
|
|
Page: 4 of 4
|
|
Article Rank:No Rank Yet
Must Log In to Rank This Article
|
|
|
|
|
Note: This is a legacy article, imported from old code. Due to this some items on the page may not function as expected. Links, Colors, and some images may not be set correctly.
|
|
|
Little Stealth 2 By: Unaclocker
|
|
Project : Little Stealth II
|
|
|
|
|
Silver Waterblock
|
|
|
|
 |
|
|
|
|
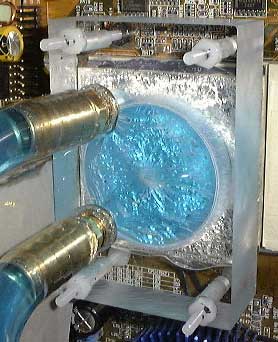
Last, and not least, the .999 Silver Polyblock from OverClock-Watercool.com. Isn't it BEAUTIFUL? The first time the flash from my camera hit it, I was like WOAH. Heh. It really looks great. I used to get questions like "Why would you want a poly block, don't they have a much higher risk of leaking?" Ok, maybe that was more of what was going acrossed MY mind, but I knew I wanted to use pure silver to cool my CPU. In fact, I brought the idea up to Chip before he had started to make them, tho I can't take credit for getting him to make them, he was already looking into it. Anyways, the point I was trying to make was, those people that couldn't understand why anyone would want to risk running one of these blocks, they just need to see this picture, and they'll see. The reason is they look truely awesome. You can't get this effect with a solid copper waterblock. For those of you that don't already know the specifics of these. They are made of Lexan, with a "swirl chamber" in the middle. They have a plate of metal glued to the bottom with something like plumbers goop. Very strong stuff, Chip sent me a prototype silverblock before this one, and for the life of me, I can't get the silver plate off of it. Anyways, the swirl chamber is completely different from other waterblocks currently for sale. The first waterblock to use this design was a waterblock called the "Tidal Pool" that overclockers.com reviewed. The waterblock was made of aluminum, and was cooling as well as the copper waterblocks of the day. (At least, on CPU's of the day, it was later re-reviewed and the aluminum couldn't keep up with TBird's heat) So I tend to think of this as a second generation waterblock design, and the silver plate allows it to compete well against the 3rd generation blocks that are out now.
|
|
|
As you can see, it's a Socket A block. After shearing the lugs off my last motherboard, and then having a really difficult time selling that motherboard because of that, I decided I would never even attempt to mount a waterblock off those lugs ever again. Chip came out with his Socket A blocks shortly after I placed my order. Luckily the silver blocks were on backorder, so I just asked him to change my order. Socket A blocks use the 4 holes that are placed around the CPU socket. These holes are also on Pentium 4 motherboards, it's actually part of the ATX 2.03 standard. This isn't the only waterblock using these 4 holes, all 3rd generation waterblocks are using them. And most second generation blocks can be adapted to use them. But this is where we come to the complaint I have with this block. All other Socket A waterblocks, and even 1/2 of the Socket A adapter plates for older waterblocks come with SPRINGS. The springs go between the nut and the top of the waterblock. So when you tighten down on the nuts, you can not only see how much force your putting down on the core, the springs are specifically selected to exert the correct amount of downward force on the core. This has 2 benefits, first of all, the waterblock is self-leveling, you don't have to worry about it being cocked off to one side and not sitting flat on the core.. Let me tell you, it's HARD to tighten 4 screws evenly all at the same time. And the other benefit is that you won't tighten too far and crush/shatter the core of the CPU. Now I discussed this with Chip for ages, I tried to make him see it my way. No dice, he's dead set that his no spring method is better than the spring method. All in the eye of the beholder I guess, as you can see, I did mount the block properly without springs, but I also ordered a set of springs from HighVoltagePC, and I intend to install them when they arrive.
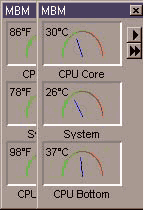
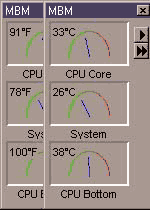
So how does the waterblock perform? Awesome.. I now have a core temp probe, it's an Asus P2T, this is a thin thermistor that you can place anywhere, even between the ceramic part of the CPU and the waterblock (not between the silicon part and the waterblock tho! heh). I trimmed off the excess plastic around the tip of this probe, and placed it directly against the base of the core (the actual silicon die of the CPU). This is how I monitored temp on my old Athlon classic when I was running a K7M motherboard, it's much more accurate than the socket temp probe, and updates alot faster too, you don't have to wait for the bottom of the CPU to change temps. So now I can see both temps in MotherBoard Monitor, and I can see that the socket probe is indeed 10f too high like it had been rumored to be, tho it tends to vary, it can get even farther out at different temperatures. Ok.. So, just to establish how much heat I'm feeding this waterblock, I have a green core TBird 750 (green means it has aluminum interconnects, not copper like the blue ones have) at 966MHz, and 1.9v, that's a modest 62 watts of heat. Here are my temps:
|
|
|
|
|
|
Idle Temp
|
|
|
|
 |
|
|
|
|
Granted, I didn't allow 20 minutes for the CPU bottom temp to catch up, I was just going for quick screen shots, the CPU core temp shows exactly what my temps are between full load and idle.
Well, this concludes Project Little Stealth. I hope you enjoyed it, and hopefully learned something from it. I love to see my ideas live on in other peoples future projects. Next week I start tearing Little Stealth apart to build The BEAST. Stay tuned for that project. If you have any questions about anything I've done here, feel free to fire off an email to me.
|
|
|
|
|
|
|
Load Temp
|
|
|
 |
|
|
|
|
|
That about wraps this article up, If you have Questions please post them on the ProCooling Forums (recommended), or Email UnaClocker directly.
|
|
|
|
| Random Forum Pic |
 |
| From Thread: can we agree on the basis of "C" in C/W ? |
|
| | ProCooling Poll: |
| So why the hell not? |
|
I agree!
|
 67% 67%
|
|
What?
|
 17% 17%
|
|
Hell NO!
|
 0% 0%
|
|
Worst Poll Ever.
|
 17% 17%
|
Total Votes:18Please Login to Vote!
|
|


