|
|
|
|
 Airspirits Watercooled Rackmount Part 3 Airspirits Watercooled Rackmount Part 3
|
|
Date Posted: Jun 4 2003
|
|
Author: Airspirit
|
|
|
|
|
Posting Type: Article
|
|
Category: ProCooling Projects
|
|
Page: 2 of 2
|
Article Rank: from 1 Readers
Must Log In to Rank This Article from 1 Readers
Must Log In to Rank This Article
|
|
|
|
|
Note: This is a legacy article, imported from old code. Due to this some items on the page may not function as expected. Links, Colors, and some images may not be set correctly.
|
|
|
Airspirits Watercooled Rackmount Part 3 By: Airspirit
|
|
|
|
|
The airspirit Watercooled Rackmount Project Phase 3
Pro/Geeks! By: Airspirit 6/04/03
|
|
|
|
|
|
|
|
|
|
|
|
Conclusions:
|
|
|
 |
|
|
There are some problems with this setup, and I will detail them here for you.
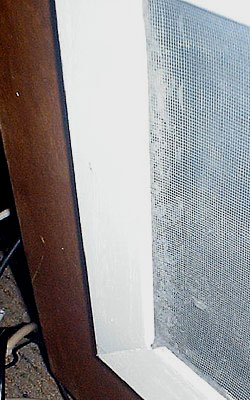
First and foremost is dust. Everyone knows how much dust a PC can pick up. Since my PCs are elevated a few feet from the floor, they don't collect dust nearly as bad as the typical PC that sits on the floor, but they collect some nonetheless, and it is difficult to clean them when they are all in stacked configuration. Quick disconnects would be extremely helpful here, but I didn't use them because of flow restrictions that shutoff disconnects add to the system. Currently, there are some in development that limit this (link), but they are prohibitively expensive to the enthusiast market. The PCs aren't the real problem, though: it is the cooling chest I worry about. At full power, I am pumping over 1000 CFM through the radiator and mesh screen in the front. Imagine a dryer lint collector after heavy use, and you'll get an idea of how much dust collects on that bugger. Even after using an entire can of compressed air, I still had dust bunnies clinging to the screen.
|
|
|
|
 |
|
|
|
This is AFTER a full can of cleaning. Gross.
|
|
|
|
|
Second is algae growth. A biocide is necessary to prevent buildup, because once it occurs it is extremely difficult to clean in a system as complex as this.
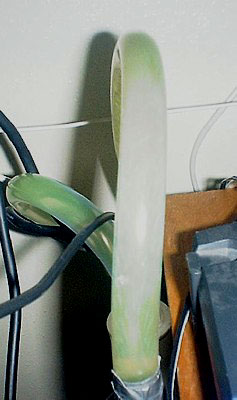
Third is wear and tear. Due to the high pressure from the pump, the soft Clearflex 60 tubing is showing internal wear. This should be lessened now that a third loop has been added, but it is still something I will have to monitor. The channels on the interior of the tubing are very worrisome, and I will probably replace this tubing before long as a precautionary action.
|
|
|
|
|
Fourth is noise. I touched on this a bit earlier, but 52 dB for a watercooling system is obscene in the eyes of most hardcore watercoolers. Since it is low pitched it doesn't bother me in the least, but it has begun to bother my wife if she is using her PC for extended periods of time. This problem, though, could be solved in the same way as the next problem....
|
|
You can see some of the channeling near the bottom of this picture.
|
|
|
|
|
|
|
Fifth is ambient heat. It is spring over here where I live and daytime temperatures typically hover around 55-65F. Between this system and the various networking devices in my back room it is typically over 90F in there. I have to leave the door open or it would quickly get hotter. When summer and 90F+ ambient temperatures arrive, it will be interesting to see what happens here. The solution, naturally, would be to rework the system so that the radiator and fans are outside, but since I live in an apartment this is not currently an option. If this is done professionally or in a hotter climate, this may be mandatory to prevent yourself and your hardware from cooking. During the winter with only two PCs on the loop I used this system to heat my entire two bedroom apartment and unplugged my baseboard heaters. When it is under 30F outside and over 65F inside it is nice ... but when your room temperatures tip over the 100F mark you have problems.
On the plus side, though, a centralized watercooling system is extremely easy to maintain and monitor. Since the pump and fans are isolated from the PCs, I can turn them on and off at will running no risk of system failure. Similarly, since all my PCs are in one location it prevents chaotic tangles of wires everywhere (somewhat). Since I run so many networking components there isn't as large of a benefit, but without the tangles of ethernet cables, it would be an extremely clean setup. Though I put heat in a negative light before, it is nice to to have warm air washing across your feet constantly ... though it won't be so nice come summer. Another benefit is not having to worry about cramming parts into cases: when I need to do system maintenance, I just remove the block and the PC is free. If I need to get to a lower machine on the stack, I can move the entire system to the living room and fold the PCs back from the stack until I reach the one I need using the tubing as a makeshift hinge.
While the temperatures of my systems aren't nearly as low as one would get by using three independent watercooling systems, I believe that convenience and reliability of one powerful system makes up for that deficiency. I would highly recommend this type of system to anyone who has stacks of PCs scattered in a centralized location (such as someone with multiple network servers), or who just wants to put two machines on one loop. I would recommend the following modifications to the project I've covered in the previous pages, however, along with a few recommendations:
- If possible, use a removable filter. These can be purchased from home improvement stores for use in centralized heating systems. This will help general maintenance tremendously.
- If possible, mount the radiator and fans in a seperate enclosure outside of your house. This would shrink the size of the base chest of the unit tremendously, and would remove sound and heat problems from your house. This may not be possible unless you own your own home.
- For God's sake use a biocide! Enough said.
- Consider your power requirements. I am running two extension cords into my back room from other rooms because of the overall power draw of all the components. Make sure you won't blow your breakers.
- Don't use cheap tubing. Considering how my good tubing is wearing, I suspect cheap vinyl tubing would have already burst, and reinforced tubing isn't flexible enough to use for these purposes.
- Add a second drain valve on the intake manifold to assist in draining. Because there isn't enough ways for air to flow when the bottom valve of the water tower is opened and the top is removed, water gets trapped in the PC loops and is difficult to remove. Another valve on the other end would make this much easier when you need to do maintenance.
- Use good casters on the bottom of the cooling chest. This will make it much easier to move it. Cheap casters don't roll well under 200+ lbs of weight.
|
|
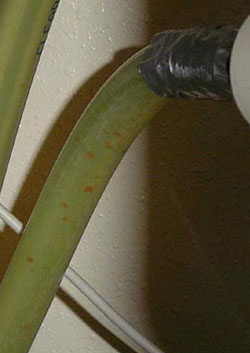
Since the rest of Phase 3 was written, much has happened with this setup. Remember how I had mentioned above that there was internal wear and tear? As it turns out, this wasn't damage to the tubing, but was some nasty algae growth. Unfortunately for me, I didn't realize that this was the case until I had some stuff growing on the insides of my tubes that looked like chicken pox.
After conferring with the guys on the forum, I was discouraged to learn that the only known effective way of cleaning this kind of mess would be to disassemble the entire system and manually clean it with pipe cleaners. As you can imagine, this was not an option that I wanted to consider, so I started looking at chemicals that could be used to flush the stuff away despite being told that such a thing was impossible to do. Certain chemicals and cleaners were eliminated from consideration early on such as bleach, hydrogen peroxide, ammonia, and methanol either for toxicity reasons or to prevent copper corrosion.
Some of the chemicals I decided to try included Lysol, Pine Sol, Liquid Algae Destroyer, and non-bromine non-chlorine hot tub sanitizer. During the cleaning process, I decided to use a high concentrate solution of Lysol and Pine Sol to kill as much of the algae as possible, then flush with the Liquid Algae Destroyer, then do another *SOL flush and it should be cleaned. The exact mixtures are as shown below:
Ultimate *SOL flush: 50% water, 40% Pine Sol, 10% Lysol
Algae Killer: water + 1 small bottle Liquid Algae Destroyer
Final Coolant Mixture: 70% distilled water, 15% Dex Cool antifreeze, 10% Hyperlube, 5% hot tub sanitizer
|
|
I found the *SOL flush worked wonders. You could actually see the algae melting off of the tubing. When it was done, all the tubing in the system was sparkling clean ... I actually can't tell the difference between the new tubing and the old. I let the *SOL mixture run for a few hours inside and literally everything was removed from the tubing.
The Algae Killer mixture didn't do quite as well. First of all, by the time the *SOL mixture was done, there was nothing left to kill, so it didn't do a bit of good. Secondly, it left a whitish coating on my tubing after only one day of circulation. Needless to say I reflushed with the *SOL to clean the tubes and everything was fine. I would not recommend that junk to anyone.
|
|
|
|
|
|
|
|
|
After
|
|
|
 |
|
|
|
|
|
|
Before
|
|
 |
|
|
Once I filled the system with the coolant described above, I have had no troubles whatsoever. The tubing shows no signs of buildup either chemical or biological, and it is as clear as ever. The coolant is a burnt orange color (quite evil, I may add) due to the dexcool/hyperlube mixture, and it is quite striking ... definitely recommended for those that have a very open and visible system if you're into that sort of thing.
|
|
|
|
|
|
Anyway, that is all! Everything has been running fine ever since. The processor in the Phase 3 machine was replaced with a 1700+ that is running at 2650 Mhz, and I have upped the RAM in it to 1GB ... it has turned strictly into an online gaming machine. Everything is running as it should, so I don't think I will be messing with this setup any further.
|
|
|
|
| Random Forum Pic |
 |
| From Thread: First Aqua Build--Need Input |
|
| | ProCooling Poll: |
| So why the hell not? |
|
I agree!
|
 67% 67%
|
|
What?
|
 17% 17%
|
|
Hell NO!
|
 0% 0%
|
|
Worst Poll Ever.
|
 17% 17%
|
Total Votes:18Please Login to Vote!
|
|


