|
|
|
|
 Airspirits Watercooled Rackmount Part 3 Airspirits Watercooled Rackmount Part 3
|
|
Date Posted: Jun 4 2003
|
|
Author: Airspirit
|
|
|
|
|
Posting Type: Article
|
|
Category: ProCooling Projects
|
|
Page: 1 of 2
|
Article Rank: from 1 Readers
Must Log In to Rank This Article from 1 Readers
Must Log In to Rank This Article
|
|
|
|
|
Note: This is a legacy article, imported from old code. Due to this some items on the page may not function as expected. Links, Colors, and some images may not be set correctly.
|
|
|
Airspirits Watercooled Rackmount Part 3 By: Airspirit
|
|
|
|
|
The airspirit Watercooled Rackmount Project Phase 3
Pro/Geeks! By: Airspirit 6/04/03
|
|
|
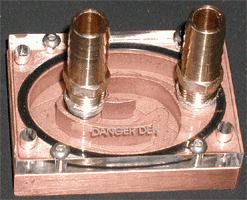
I've come to the point where I can start on Phase 3. Thanks to the support of Danger Den andCooltechnica for their support of the Pro/Geeks contest at Pro/Cooling, I found myself with a spare Maze 3 and six feet of Clearflex 60 1/2" ID tubing. Since I have a centralized cooling system, this and a few clamps and barbs are all I need to add another PC to the cooling loop. I had the luck of being able to acquire enough extra parts in early April to dismantle my current PCs and reassemble the assorted parts into three competent PCs. This means that the specs of the machines from Phases 1 and 2 are different, so here is an update:
Computer Specs (Phase 1):
Athlon 2100+ @2132 Mhz/1.825V, EPoX 8RDA+, 512 MB Corsair XMS2700 @2.9V, CDRW drive, DVD-R/RW drive, 80GB HDD, 1xNIC, 480W Antec TruePower PSU, ATi Radeon 8500LE, 1x80mm case fan @ 7V. This will primarily be a gaming rig, so heavy loading of the CPU is a given.
Processor Stepping: JIUHB 0308VPMW. This stepping runs slow and HOT.
Computer Specs (Phase 2):
Athlon 700 @770 Mhz/1.6V, EPoX 7KXA - KX133, 640 MB generic PC100 SDR @Std. V, DVD-ROM drive, 20GB HDD, 2xNIC, SB Live! sound card, 300W single fan PSU, Matrox G400, NO CASE FAN. This will be a dedicated Linux network server, and will be run 24/7, though it will be rare that it reaches full load.
|
|
|
|
The Phase 1 machine runs significantly hotter now due to the new processor, and it is now using the Maze 3 block on a 1/2" cooling loop. I'm jumping ahead of myself a bit here, since I haven't discussed Phase 3 yet, but when run by itself with the other two PCs off, it is running 46C idle and 50C load. This is significantly WORSE than the previous temps, even when using a significantly better water block. This processor will be replaced as soon as possible, as I refuse to leave a processor this hot on my cooling loop, especially considering its poor overclocking performance. Bear in mind that the other two loops I will be using (with the Black Edge blocks) narrow down to 3/8" towards the water blocks, so this one block is getting about 45% of the total flow for the entire system. In reality, it is getting (after Phase 3) approximately the same amount of water flow as one Black Edge block was getting as of the end of Phase 2.
|
|
|
|
|
|
Over the course of the last five months I've had a mixture of 95% distilled water and 5% laboratory grade isopropanol running through my cooling loop and I've noticed a buildup of reddish material in my bubble tube, and a greenish/blue material coating my Clearflex lines. This has concerned me since I have added no anticorrosive additives into my system. I found upon disassembly that this was not corrosion at all: it
|
|
|
|
|
 |
|
|
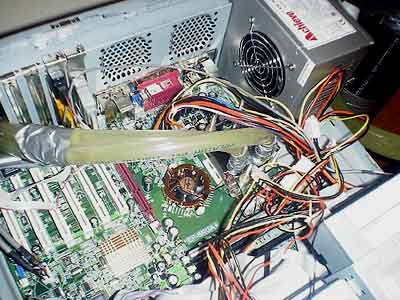
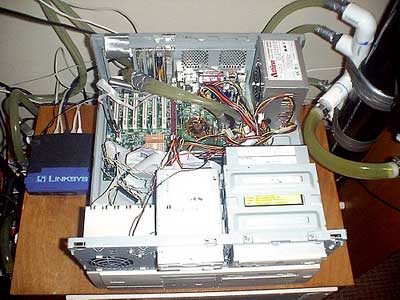
Notice the 1337 knitting yarn used to ensure my tubing clears my graphics card. Space is definitely at a premium in this case!
|
|
|
was some of the nastiest algae that I've ever encountered. The stuff was like hardened Jell-O, and was extremely difficult to remove from the loop. I ran a high concentration bleach/water solution through my loop, rinsed it with water, and still had some of the junk coating my hoses. The bubble tube was then removed and soaked in hot soapy water, with no better results. I ended up having to blast the bubble tube out with a pressure washer, and then after adding my third cooling line refilled the system with 90% distilled water and 10% Hyperlube anticorrosive additive, and that did the trick: the gunk quickly was "dissolved" into the coolant, and now milky white crap is floating in there. For the purposes of this article, I will leave the gunk in the system. I want to run the loop for at least two weeks to ensure that all of the algae is killed and dissolved before draining, flushing, and refilling my system. My blocks, radiator, pump, fittings, and piping showed absolutely no sign of corrosion during inspection, proving that the anticorrosive coating on the steel JIC fittings worked flawlessly.
|
|
|
|
|
Also, for the purposes of this article and probably permanently, I will be running the fans at full power. The combined noise from all of the case fans, PSU fans, pump, and radiator fans now approaches 52 dB. This is mostly low pitched, so it is not nearly as annoying as a high pitched delta fan, for example, and it is something that I have grown to be able to ignore. It is on par with being inside the cabin of a quiet diesel pickup when the engine is not accelerating: you know it's there, but it isn't an annoyance. The reason for this is that I have increased the bypass width to increase overall flow and added another 80W heat load to the loop: I will take absolutely no chances of general system failure.
|
|
|
|
Computer Specs:
Athlon 1900+ @1676 Mhz/1.90V, EPoX 8RGA+, 256 MB Corsair XMS3200LL @2.9V
|
|
|
|
I would like to start this with a critical review of the NForce2 IGP platform. I have now installed over a dozen different NForce2 boards, and I've had great success with all of them ... except for the IGP boards. With identical memory and processors, they consistently clock much lower than the SPP boards. I have clocked the above Palomino to 1826 Mhz rock stable in my 8RDA+ board, but it will not remain stable over 1676 on the 8RGA+. This is the third NForce2 IGP board I've installed, two of them being the 8RGA+, and one of them being the ABIT NF7-M, and all have fell far short of the overclocking potential of the SPP versions of that board. I am not sure if is a manufacturer problem or a fundamental problem with the IGP
|
|
|
|
|
 |
|
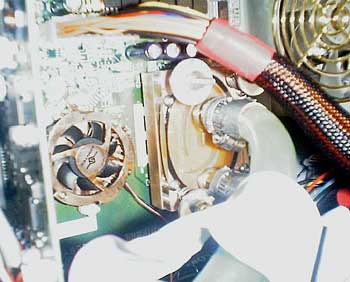
Another NForce2 board, another Vantec Copper Iceberq. I swear by those things. Note the the well organized power cables.
|
|
|
chipset, but these boards should be avoided at all cost unless you require integrated graphics. Since this machine will primarily be an office workstation and occasional gaming rig, I'm not overly worried about the speed hit that I'm faced with, but if this was my primary gaming rig I was dealing with, I would be spitting nails right now. While all the overclocking tools in the world are available in the BIOS, they don't help at all compared to what they do on the SPP boards.
|
|
|
|
|
|
 |
|
|
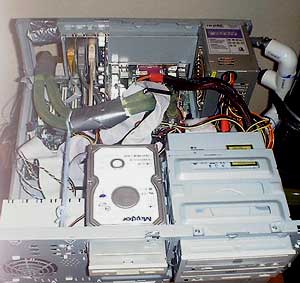
Without the expansion cards, installation is much easier. The rolled tubes of tissue paper and duct tape at the entrance along with the duct tape wrapping of the tubing prevents the entrance edging from damaging the tubing.
|
|
|
|
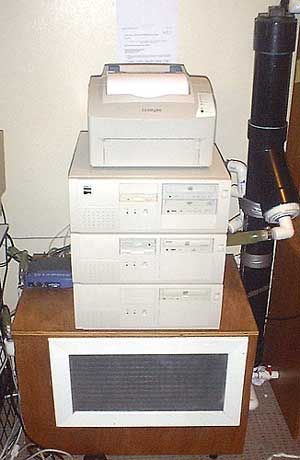
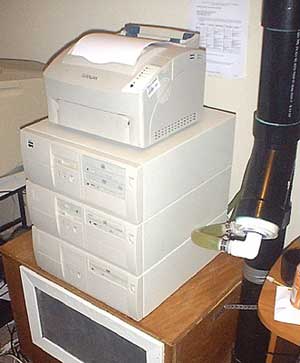
I found quite quickly that I may have a problem with adding a fourth PC to the cooling loop. Currently, the weight of the three PCs tops out at around 110 lbs, with a 10 lb printer straddling the whole mess. Combine this with the weight of the hoses pulling down (small, but not insignificant), and you have quite a bit of weight to be supported. Looking at the diagram of how the rubber feet on the base of the cases sit on the top of the others, you can see how problems may be caused. Since I have removed the roof brace to allow room for the water blocks and tubing, there is nothing under the feet in the lower cases to support the weight except for the strength of the sidewalls of the case themselves combined with the anti-flex strength of the top sheet of metal. This is a bad situation, and I have noticed minor bowing in the bottom case's top. A fourth PC would probably cause damage at best, and outright collapse at worst. These are not heavy duty cases ... imagine jumping on a cheapo case repeatedly, and you would see the reason that this may be a very bad situation if I continue my PC stacking without a supportive rack. Since I don't plan on adding a fourth PC to this system, I won't be adding a rack.
|
|
|
On to the fun: when adding this machine in, I decided that I would stay with the previous structure and place the slowest machines on the bottom and the hottest machines on the top. The reason is that the slowest machines will dump the least amount of heat into the system, but being at slightly higher flow it would clear the radiator better. The hotter machines, however, will be run a little hotter from flow starvation, but it will allow the ΔT to remain as high as possible, allowing the portion of the flow that gets routed through the radiator to be cooled as effectively as possible. This machine will be placed in the middle of the stack, with the Phase 1 PC on top and the Phase 2 PC on the bottom. On a more practical note, I will be tinkering with my gaming rig more than the other two, so having it up top makes that a bit easier.
|
|
|
|
|
|
 |
|
|
|
|
|
Note: again, I would caution against working on a watercooling system while inebriated ... this would have gone much quicker if I had left the booze in the fridge.
|
|
|
|
|
|
|
|
|
|
|
 |
|
|
With the added airflow through the radiator, the further opening of the bypass valve, and the added heat from the 2100+ fireball, I expected temperatures to raise, but not too much overall. I also added Hyperlube, which besides its effect as an anticorrosive, it also acts as a surfactant. This helped a bit over straight water, but proved unable to lower the temperature of the system in conjunction with the extra airflow to the point where it was before the addition of a third loop. I suppose there are only so many things you can do to counteract lower flow rates, and most of them DO NOT WORK. With all of the machines simultaneously held at either idle or load, I had the following results:
- Phase 1 PC temps: 48C idle, 52C load
- Phase 2 PC temps: 37C idle, 40C load
- Phase 3 PC temps: 43C idle, 48C load
|
|
|
|
|
|
 |
|
|
|
|
|
|
While there wasn't a significant increase in temperatures from the two processors (again, note that the Phase 1 CPU is in the Phase 3 PC), it is noticeable. I also noticed that because of the increased bypass flow, the temperature of the coolant is now noticeably warmer than before, though this is from the "touch and guess" method of temperature measurement, rather than from hard data (BillA will have a fit here, but I just don't have the cash left over to install a temperature sensor in the water tower, and I wouldn't have data from previous phases to compare it to anyway). I have also noticed that the radiator is noticeably warmer, though it seems to be holding up very well under the increased load
|
|
|
|
|
|
 |
|
|
I believe that the Redesign and Phase 3 are complete successes.
|
|
|
|
|
|
| Random Forum Pic |
 |
| From Thread: Anouther spiral |
|
| | ProCooling Poll: |
| So why the hell not? |
|
I agree!
|
 67% 67%
|
|
What?
|
 17% 17%
|
|
Hell NO!
|
 0% 0%
|
|
Worst Poll Ever.
|
 17% 17%
|
Total Votes:18Please Login to Vote!
|
|