|
|
|
|
 How to mount a Raditor to your Rig How to mount a Raditor to your Rig
|
|
Date Posted: Nov 19 2000
|
|
Author: OnDaEdg
|
|
|
|
|
Posting Type: Article
|
|
Category: H2O and Evap
|
|
Page: 1 of 1
|
|
Article Rank:No Rank Yet
Must Log In to Rank This Article
|
|
|
|
|
Note: This is a legacy article, imported from old code. Due to this some items on the page may not function as expected. Links, Colors, and some images may not be set correctly.
|
|
|
How to mount a Raditor to your Rig By: OnDaEdg
|
|
How To Mount a Radiator And Cooling Fans in Your Case
|
|
|
|
|
|
|
|
|
|
|
|
|
|
|
|
|
|
|
|
|
|
|
|
|
|
By : OnDaEdg
Date: 11/19/00
|
|
|
|
I receive a lot of emails by guys on the various forums throughout the overclocking community on how to go about mounting a radiator inside a case. Rather than continue to write the same email over and over, I decided that I would write a series of articles on the continuing progression of my latest watercooling system. There are a few things I would like to state first before I continue. Before I begin a new water cooling project, I outline five main goals to be achieved. Here are the five goals I have decided on for this new project:
|
|
|
- It must operate as reliably as an air cooled heatsink for extended periods of time.
- It must be fully enclosed inside the case itself.
- There must be no leakage or condensation whatsoever.
- It must run quietly.
- The ladies must dig it! (In other words, it must look good)
|
|
|
|
Now that the goals for this water cooling system has been detailed, let's begin with the mounting of the radiator. First, we need certain tools to mount this baby. You will need a jig-saw, metal cutting jig-saw blades, a hand drill, a 3/8 drill bit to create starting holes, a rotary tool with a metal grinding bit, and some masking tape.
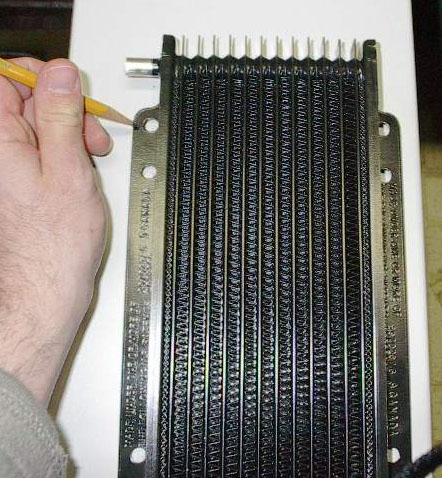
The first thing that we have to do is decide on a location to mount the radiator. The radiator I have chosen to use is a Hayden 676. Its dimensions are 11in.x 5in.x .5 in. I chose this radiator for two reasons: First, it has mounting flanges as you can see in the picture. These flanges will help make the actual mounting a very simple process. Secondly, the dimensions of the radiator will allow me to place it just about anywhere in the case. After nearly an hour of studying my case, I decided to not place it on a side panel like so many others choose to do so. Reason being is that this creates unneeded complications each time the side cover has to be removed. I decided to place it on the top of the case and use elbow shaped compression fittings to deliver the coolant. This decision was based on the pure simplicity of the placement. Here it will be out of the way of everything within the case as well as be very simple to mount (Also makes a great conversation piece). Now that we have decided on where to mount the radiator, it is time to draw a template of the radiator on the top of the case. Holding the radiator down, I draw an outline of the radiator as well as the mounting holes.
|
|
|
Draw'n it all out
|
|
|
 |
|
|
|
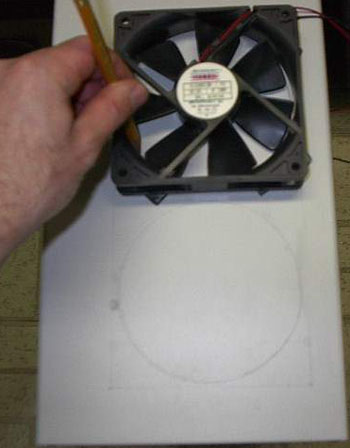
Now that this has been completed, it is time to lay the 120mm fans down directly over the outline of the radiator. Obviously, both cooling fans are going to lay below the radiator bolted from underneath to the top of the case. Once again, I draw a template only this time of the fan's inner diameter. Basically, I am drawing two circles side by side.
|
|
|
Draw'n those big Mutha's
|
|
|
 |
|
|
|
Here are the completed drawings: Despite how the photo looks, the circles have been drawn perfectly with a bit of smudging done by my hand. Note the masking tape I have placed around the template. This is done to preserve the finish of the case while I cut the circles. Also note I have already drilled a starting hole for the jigsaw blade.
|
|
|
Pretty Eh?
|
|
|
 |
|
|
|
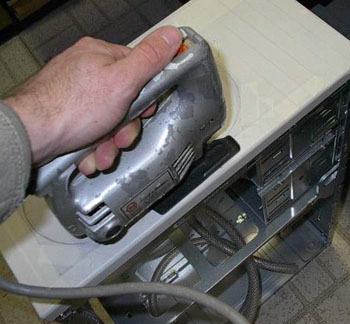
Now the fun part begins. Time to start cutting the holes! While cutting, you should be fairly careful to make sure that you cut the holes close. If the holes don't end up as good as you would like, don't worry about it too much since they won't be visible anyway. Boy is that jigsaw old...
|
|
|
Check it out folks, One handed!
|
|
|
 |
|
|
|
Well, here is the top of my case with two gaping holes in it. What the hell! Errr, oh yeah, I did that. Anyway, the tough part is over. So far so good. Also note that I went ahead and drilled the mounting holes for the 120mm fans.
|
|
|
Flip it upside down and turn it into a hovercraft
|
|
|
 |
|
|
|
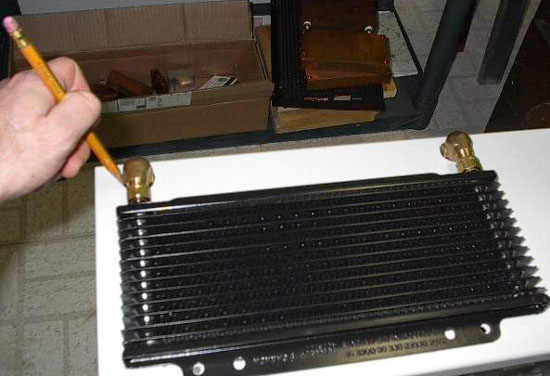
Now that the holes needed to mount the fan and radiator have been completed, I now need to drill the holes for the elbow shaped compression fittings I will be using. First I draw an outline of the compression fittings onto the case.
|
|
|
More drawing.. But look at the goods in the background!
|
|
|
 |
|
|
|
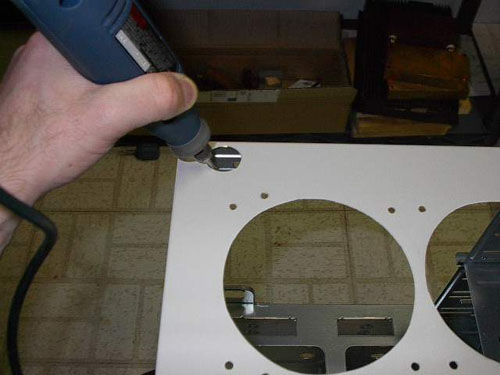
Now I drill a hole through the compression fitting outline. I then use a rotary tool to grind out the remaining metal within the outline. (Yes, those are one inch thick copper blocks in the background!)
|
|
|
Ohh Yes, a Geeks best bud - a high RPM rotary tool
|
|
|
 |
|
|
|
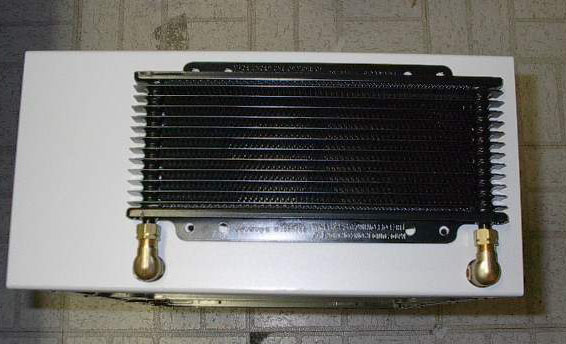
After the holes for both compression fittings are done, let's put it all together and see how it looks.
|
|
|
 |
|
|
|
I can honestly say that the radiator mounting was a huge success. I kept it simple, and clean as well. Next up I will tackle the difficulties of the copper waterblock. Until then, OnDaEdg is out!
|
|
|
|
That about wraps this article up, If you have Questions please post them on the ProCooling Forums (recommended), or Email OnDaEdg directly.
|
|
|
|
Articles Home
|
|
|
|
|
|
| Random Forum Pic |
 |
| From Thread: Moving Heatercore Barbs? |
|
| | ProCooling Poll: |
| So why the hell not? |
|
I agree!
|
 67% 67%
|
|
What?
|
 17% 17%
|
|
Hell NO!
|
 0% 0%
|
|
Worst Poll Ever.
|
 17% 17%
|
Total Votes:18Please Login to Vote!
|
|


